


Always test outdoors under optimal sunlight
conditions.
A. Testing SolarFlats for Voltage
Connect Voltmeter to each individual panel
separately and observe open voltage. Open
Voltage can range from 16 Volts to 24 Volts.
Once all panels are tested for voltage,
proceed to step B.
B. Test Connection to Charge Controller for
Voltage.
Reconnect SolarFlats, can connect to Charge
Controller as per Charge Controller
instructions. Measure open circuit voltage at
the battery side of the Charge Controller.
Open circuit should read 5-10% lower than
without Charge Controller, resulting in
measurement between 15V and 23.5V.
C. Connect Charge Controller to Battery.
First, disconnect solar panels and connect
Charge Controller to battery. Always connect
Charge Controller to battery first and remove
last. Observe polarity – positive to positive
and negative to negative.
D. Re
connect Solar Panels to Charge
Controller.
If battery voltage is 14.2 or higher, the
GREEN light should be on. If battery voltage
is between 13 and 14.2, the YELLOW light
should be on. If battery voltage is 13 or
lower, the Yellow light should be on.
If all testing results with voltages within the
above indicated ranges, solar system is in
acceptable range. If voltage reading indicates
lower ranges, repeat above connections and
retest.
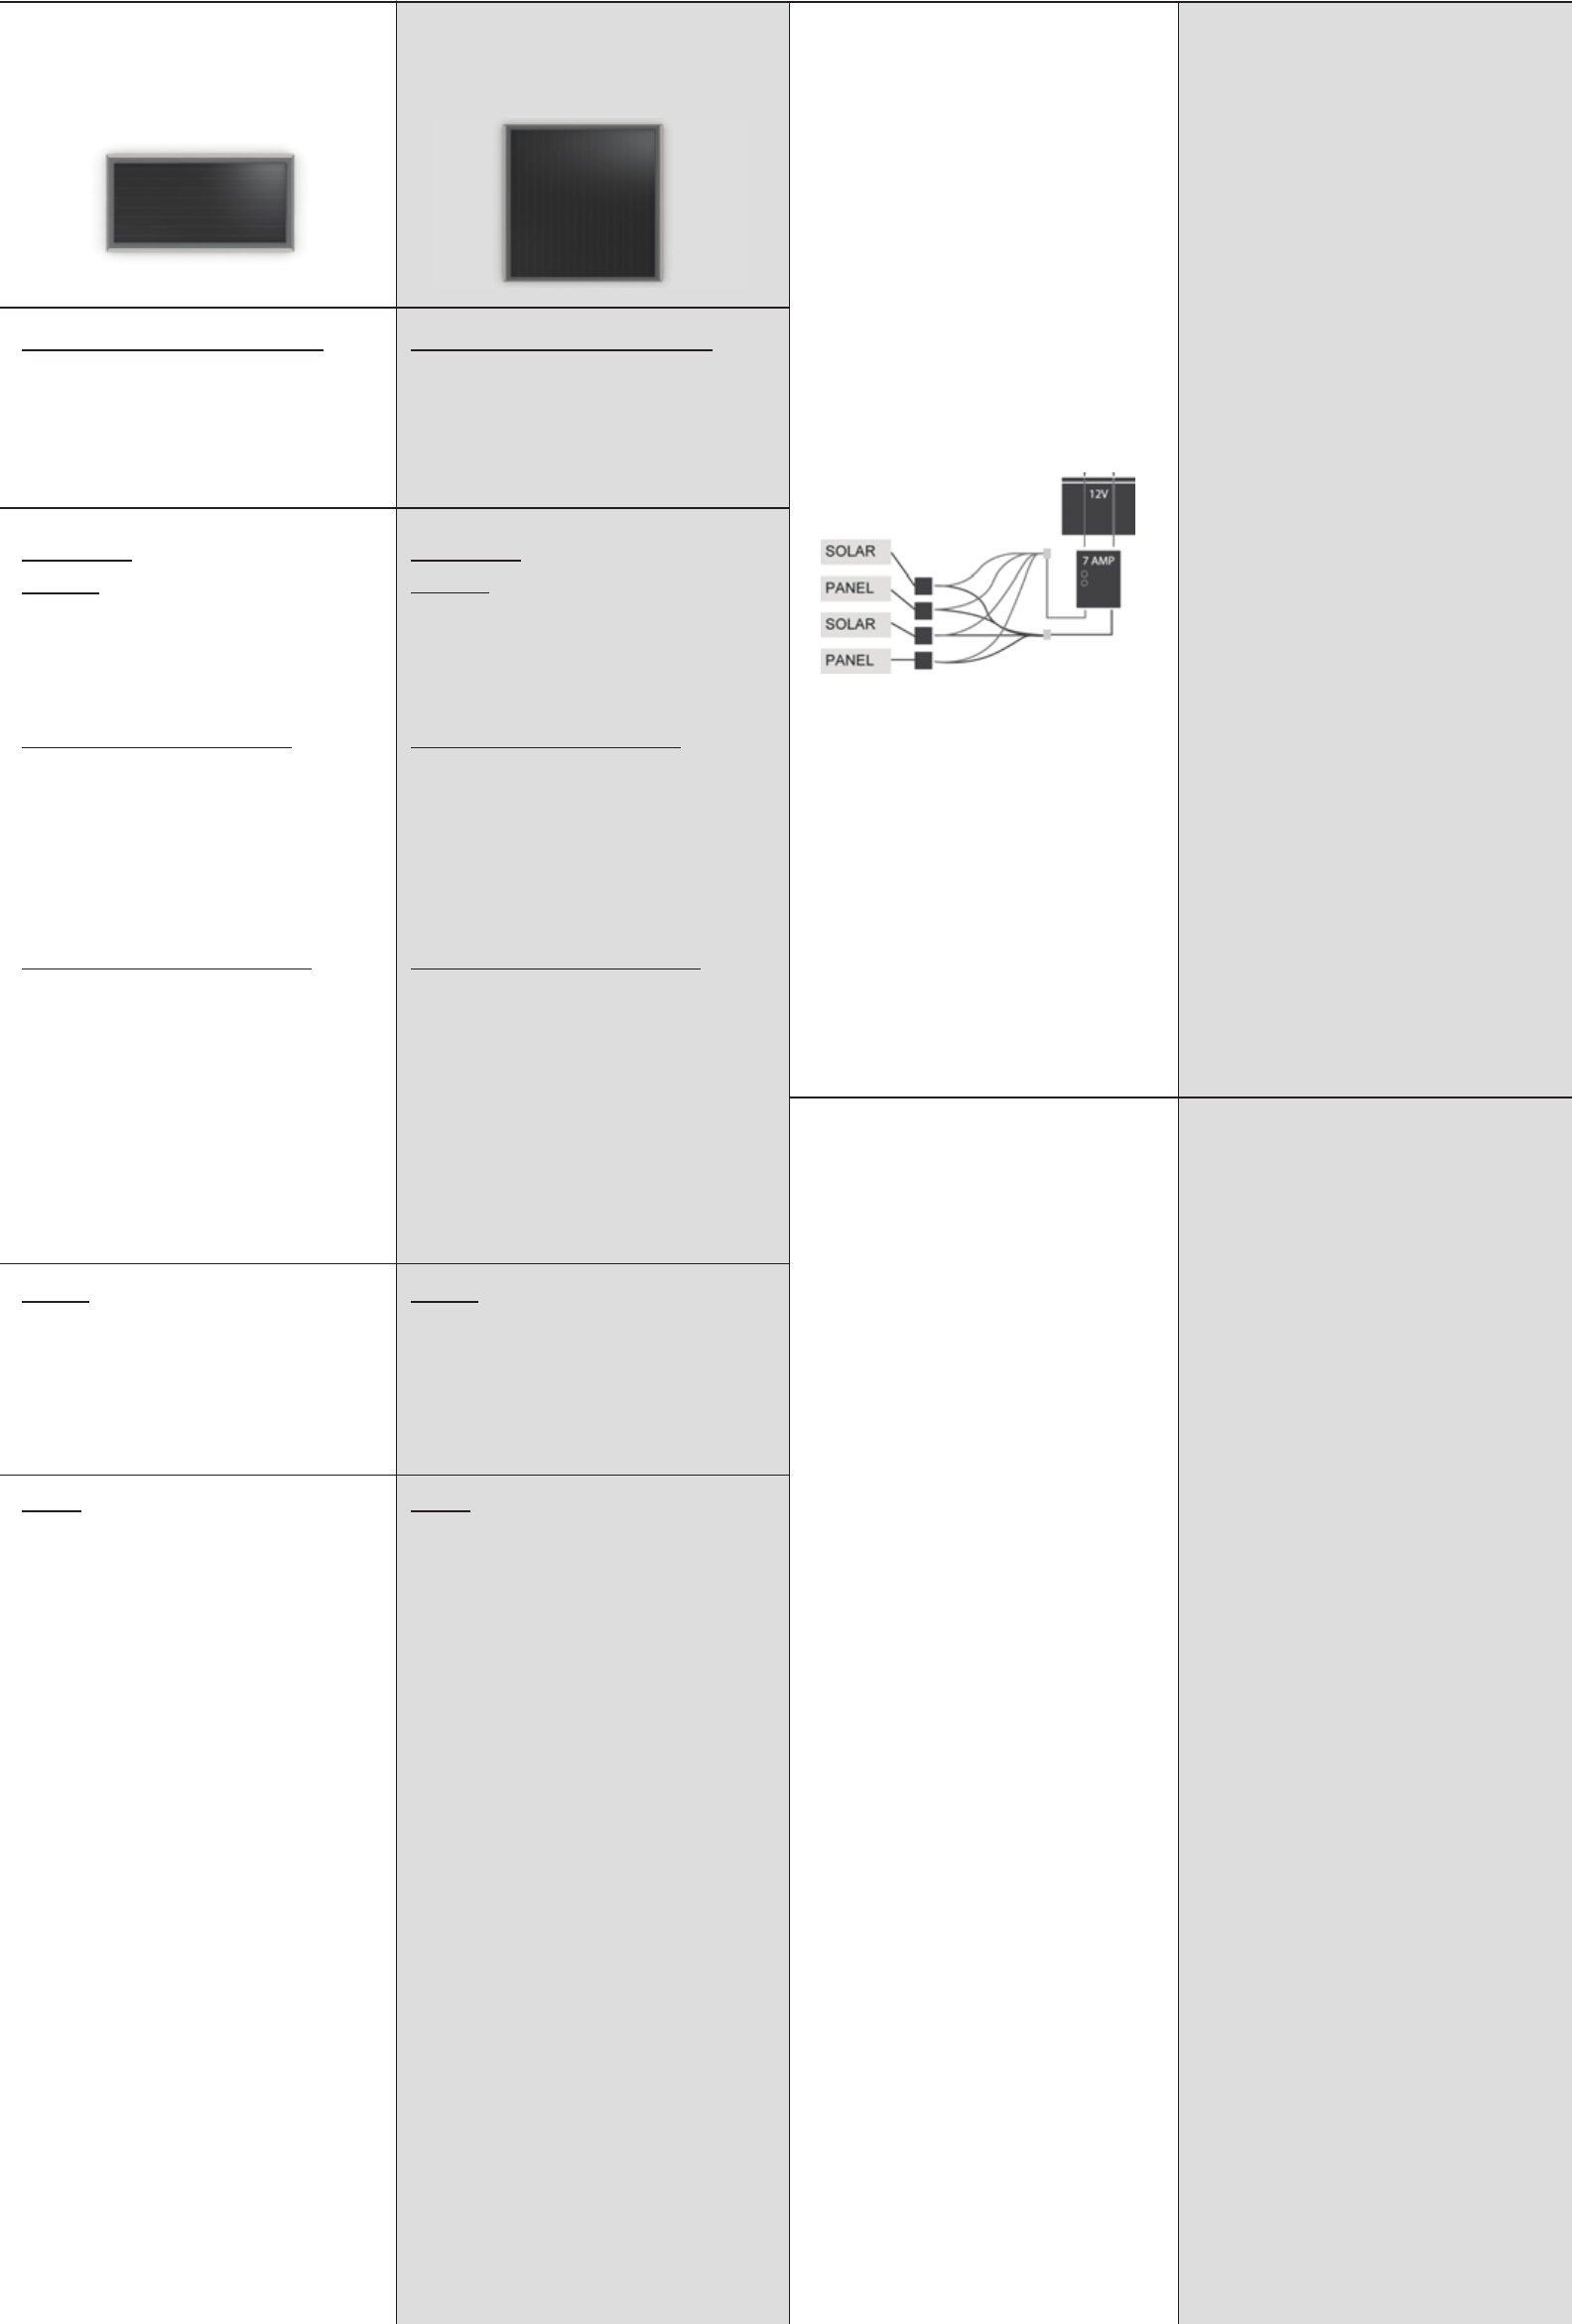
Connecting
Multiple Panels
SolarFlat 2W/6V
Battery “Maintainer”
SolarFlat 5W/24V
Battery “Trickle Charger”
General Solar
Information
Specifications & Included Items: Specifications & Included Items:
Power Rating: Up to 2 Watts
Max Current: 150 mAmps @ 14 Volts
Includes: Solar Panel, 12ft wire, Battery
Clamp, Bare Wire Inter-
connector and LED test light
Power Rating: Up to 5 Watts
Max Current: 150 mAmps @ 36 Volts
Includes: Solar Panel, 12ft wire, Battery
Clamp, Bare Wire Inter-
connector and LED test light
Installation: Installation:
Connecting Using Battery Clamps:
1. Connect the Battery Clamp connector to the
SolarFlat extension cord.
2. Connect the battery clamps correctly by
matching the red clamp, which is Positive (+), to
the Positive (+) terminal on your battery.
3. Connect the black clamp, which is Negative (-),
to the Negative (-) terminal on your battery.
*Follow this carefully to not cause any bodily harm.
Connecting Using Bare Wire Adaptor
1. Connect the Bare Wire connector to the
SolarFlat extension chord.
2. Securely connect bare wire cables to adjoining
positive and negative cables.
*Note that negative bare wire cable is the cable
without writing on black sheath of wire.
Mounting:
For optimal performance, choose a high sunlight
area and place securely with solar panel side
facing directly towards the sun.
*Note: Do not screw holes directly through front of
frame. This will cause damage to solar product.
• Using the included bare wire connector
adaptor, join positive wires to positive wires
and negative wires to negative wires to
ensure voltage. Make sure all connections
are tight using wire nut connectors.
Insulating materials may prove helpful.
• For anything above 15W, use a Solar
Controller Charger to prevent battery
overcharge.
Notes: Notes:
• SolarFlat LED Test Light can be connected to
extension cord to indicate that solar panel is
functioning properly.
• SolarFlat includes blocking diode to prevent
reverse current.
• SolarFlat LED Test Light can be connected to
extension cord to indicate that solar panel is
functioning properly.
• SolarFlat includes blocking diode to prevent
reverse current.
FAQs:FAQs:
1. Can I use the panel outdoors?
A.Yes, this panel has been weatherproofed.
2. What type of batteries can my SolarFlat 2 charge?
A.All 6V batteries like ones used in deer
feeders and cameras.
3. Can I overcharge my battery?
A.The SolarFlat 2 has a built in blocking diode
that prevents battery discharge and
overcharging.
4. Will the SolarFlat 2 keep my battery fully charged?
A.The Maintainer charges your battery with the
power of the sun. It compensates for key
offdrain and long periods of non-use and on
board electronics. It is designed to maintain
batteries.
5. How long does it ta
ke to charge a dead battery?
A.The unit is designed to maintain batteries
only. If the battery is dead, we recommend a
larger output solar charger such as the 5W or
15W Brunton SolarFlats.
6. Can I extend the wire?
A.The 12’ wire can be extended up to 24’
without loss of power of voltage damage.
1. Can I use the panel outdoors?
A.Yes, this panel has been weatherproofed,
including UV protection and for weather
effects of -35° F to 175 ° F.
2. Will panel drain battery at night?
A.No, this panel includes a battery diode to
prevent battery drain and reverse current.
3. What type of batteries can my SolarFlat 5 charge?
A.Any deep cycle 24V battery.
4. How long will it take to charge a battery?
A.Under ideal conditions, this panel will
generate up to 36V and 150 mAmps of
current. A 5W panel is not designed to
charge batteries, but only trickle charge
batteries thereby insuring quick starts.
5. Can I run appliances off this panel?
A.Yes, however, the current will vary depending
on the sunlight. Charging a battery is
therefore the recommended installation and
running protocol
6. Do I need a Solar Controller?
A.No, a charge controller is only recomm
ended
for panels greater than 15W.
7. How far can I extend the wire?
A.Current length should accommodate 95% of
installations, however, wires can be extended
up to a maximum of 30ft. with 16 gauge wire.
Brunton Solar Panel Instructions
General Testing Protocol
(For Solar Charge Controller)
THESE PRODUCTS ARE
WARRANTED FROM DEFECTS
IN WORKMANSHIP AND
FUNCTIONALLITY FOR A
PERIOD INDICATED ON THE
PACKAGING. THIS
WARRANTY DOE NOT APPLIY
IN THE EVENT OF MISUSE OR
ABUSE OF THE PRODUCT, OR
AS A RESULT OF
UNAUTHOURIZED REPAIRS OR
ALTERATIONS. POWER
OUTPUT IS WARRANTED UP
TO 80% OF STATED OUTPUT
AND MUST BE TESTED UNDER
FULL SUNLIGHT CONDITIONS.
TO ADDRESS WARRANTY
ISSUES, PLEASE CONTACT
BRUNTON, INC. CUSTOMER
SERVICE:
2255 BRUNTON COURT
RIVERTON, WY, USA, 82501
PHONE: 307.857.4700
WWW.BRUNTON.COM
Limited Warranty
A. How do solar cells generate electricity?
Solar panels, also known as Photovoltaics, or
PV for short, can be thought of as a direct
current (DC) generator powered by the sun.
When light photons of sufficient energy strike
a solar cell, they knock electrons free in the
structure forcing them through an external
circuit (Battery or direct DC load), and then
returning them to the other side of the solar
cell to start the process all over again.
B. Will solar work in my location?
Yes, solar is universal and will work virtually
anywhere, however, some locations are
better than others. Irradiance is a measure of
the sun’s power available at the surface of the
earth, and it averages about 1000 Watts per
square meter. Obviously, different parts of
the world receive more sunlight than others,
so they will have more “full
sun hours” per
day, resulting in more power from solar
panels.
C. These panels are made of amorphous
type solar panels. What is the difference
between amorphous and polycrystalline
cells?
Amorphous solar panels contain no cells per
say, but are created through a deposition
process which actually forms the silicon
material directly on the glass substrate. To
understand this a bit clearer, think of it as
spraying the silicon onto the glass in very thin
layers. This film which gives amorphous
panels the “thin-film” nickname, is laser
patterned, which interconnects instead of
physically connecting tabs which eliminates a
mechanical connection that can break down
and fail. The amount of si
licon used in this
process produces a film which is often up to
100 times thinner than that of a polycrystalline
cell. Furthermore, amorphous type solar cells
are better at generating electricity in all
lighting conditions.