


BK36 36 Inch Metal Brake With Stand Assembly & Operating Instructions
6
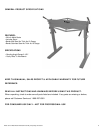
ASSEMBLY
The Brake is VERY heavy and
requires that two people assist with assembly and installation.
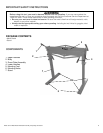
1. Put the brake on the floor and position the mounting feet facing forward.
2. Put the left brake stand mounting pad facing against the left mounting foot. Assemble with the
bolt, washer and nut and tighten securely.
3. Put the right brake stand mounting pad facing against the right mounting foot. Assemble with
the bolt, washer and nut and tighten securely.
4. With the help of two people, lift the Brake and Stand upright.
5. Put the Brake and Stand where it will be mounted to the floor and mark through the holes on
the left and right side.
WARNING: Make sure that you will not be drilling through electrical conduit or water pipes,
before drilling the mounting holes.
6. Drill holes to the floor. Secure the brake with bolts, lock washers, & nuts (not included).
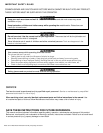
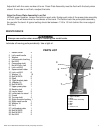
OPERATION
Do not bend stock that is thicker than 12 gauge. You will damage the Brake.
Measure the thickness before use. During bending, keep both hands on the
lower handles.
Lift up the Handles to open the Press Plate Assembly. Insert sheet metal that you want to bend
over the Body and under the upper Press Plate Assembly. Slide sheet metal and align the bend
marks on the metal to the inner lip of the Body.
Press down on both Handles to the locked position. This will cause the upper Press Plate
Assembly to clamp down on the stock. If the Handle does not come down all the way and lock,
either the stock is greater than 12 gauge, or the Brake needs to be adjusted to allow for a
thicker stock.
Using both hands, lift up on the Body using its lower Handles until the desired angle is reached
on the stock. Once bend is complete, return lower Handles to down position.
Lift the upper Eccentric Handles all the way up and remove the sheet metal.
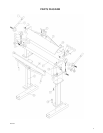
MAKING ADJUSTMENTS
You may need to adjust the position of the Press Plate Assembly to allow for thicker or thinner
pieces of sheet metal, or to align it to the Body.
Adjust for Thickness of Sheet Metal
Lift the upper handles all the way up and loosen nuts to allow the bolt to move up or down.
Using an open end wrench, turn the bolt clockwise and move the Press Plate Assembly down, or
counterclockwise to move it up (for large stock).
Determine the number of turns, then tighten the nuts to secure the bolt. Repeat on opposite side.