


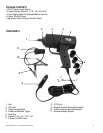


Model IW12BX 12V 1/2" DC Electric Impact W
rench
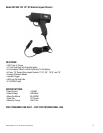
6
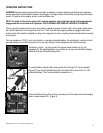
H
I
J
K
L
N
M
Select the appropriate size socket (H) to fit the wheel lug nut. Attach the socket
to the impact wrench by pressing it on to the Anvil (I). For best results, use only the
sockets that came with this wrench. Be sure the spring-loaded pin (J) on the Anvil lines
up with the matching hole on the socket securing the socket firmly to the impact
wrench. (Figure 4)
NOTE: The motor in this wrench spins until it reaches maximum speed, then the
internal clutch automatically engages and the nut is loosened or tightened. THIS
IS NORMAL AND DOES NOT INDICATE A PROBLEM.
Figure 4
Use the impact wrench to loosen the lug nuts on the wheel while the vehicle is still
firmly on the ground, otherwise the wheel will spin. Once the lug nuts are loosened,
use the vehicle jack to lift the vehicle off the ground. Refer to the vehicle owner’s
manual for instructions on using the jack. When the vehicle is off the ground, finish
removing the lug nuts by hand or with a socket wrench.
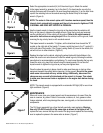
This impact wrench is reversible. To tighten, set the directional lever toward the “R”
symbol on the right side of the handle. To loosen, switch the lever to the “L” symbol (L)
on the left side of the handle. If the Trigger Locking Switch (K) is set in the middle, the
unit will not turn in either direction. (Figure 5)
Figure 5
Replace the wheel on the vehicle, aligning the wheel studs with the boltholes in the
wheel. Be sure the air valve faces out. Install the wheel lug nuts, following the vehicle
manufacturer’s recommendations on tightening. To avoid cross-threading the lug nuts,
thread the nuts on by hand first, before using the impact wrench. Do not use the
impact wrench to tighten the lug nuts as you may over-tighten them.
Once the wheel is securely in place, check to make sure there are no tools or other
equipment beneath the vehicle before lowering it to the ground. Do not let the power
cords come into contact with any vehicle wiring. Additionally, disconnect the
clamps as soon as work is finished and put the wrench in its case. Then check
to make sure there are not tools or equipment on the engine deck before closing
the hood.
Figure 6
NOTE: This impact wrench is equipped with an automatic LED light (M) for use in low
light conditions. (Figure 6)
MAINTENANCE
When not in use, store your impact wrench and its accessories in its case. Store the
case in a secure, dry place. Protect it from water, moisture, oil, fuel, grease or other
foreign materials, which may damage the case, moving parts, or its internal electrical
components.
The 12V plug-in assembly has a fuse that will eventually need replacing. Warning:
Use only 12A-250V fuses (N) of the same style as shown in the figure at left. To
replace the fuse, remove the cap at the end of the plug-in and replace the fuse making
sure to replace the pieces in the same order as shown. (Figure 7)
Figure 7