


25 Series Rotary Tiller
7
ASSEMBLY
The machine is shipped with the PTO shaft not installed.
To install the PTO driveline on the machine, follow this procedure:
1. Clear the area of bystanders, especially small children.
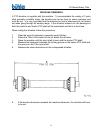
2. Clean the splines on the yoke and the input shaft.
3. Align the splines on the yoke and the shaft.
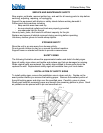
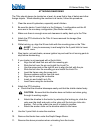
4. Attach the driveline to the tiller by removing the tapered pin and sliding the
yoke onto the gearbox shaft. Line up the pin with the groove in the
gearbox shaft and fasten with the tapered pin. The plastic gearbox PTO
guard has a removable door on top to access the pin. The A-frame brace
can be removed to improve accessibility. Replace the brace after
tightening the nut on the tapered pin.
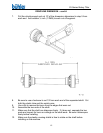
5. Be sure the yoke is locked in position. Pull on the yoke to be sure the pin
clicks into position.
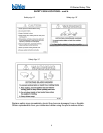
6. Be sure that the PTO shaft is the appropriate length for the tractor/Tiller
combination. Refer to Driveline Dimension Section for details.
START UP
MACHINE BREAK-IN
Although there are no operational restrictions on the Tiller when used for the first time, it
is recommended that the following mechanical items be checked:
A. After operating for 1/2 hour or after completing 1/2 acre:
1. Check all nuts, bolts and other fasteners. Tighten to their specified torque
level.
2. Check that the blades are in good condition and bolted securely to the
rotor.
3. Check the oil level in the gearbox. Add as required.
4. Check that the PTO driveline shield turns freely.
5. Lubricate all grease points.
B. After operating for 5 hours and 10 hours:
1. Repeat items 1 through 5 of Section A.
2. Then go to the regular service schedule as defined in Section 5.