


• Loosen the silver screws located at the opposite end of the Fine Adjustment Cables (14). Now, attach
the Fine Adjustment Cables to the two silver posts found on the Equatorial Mount. The first post is
located just above the Declination Lock Knob (3), the second post is located below the Right Ascension
Lock Knob (4).
• Locate the Counterweight (6) and Counterweight Shaft (5). Loosen the
thumb screw located on the Counterweight and slide the Counterweight
onto the Counterweight Shaft and tighten thumb screw to secure the
Counterweight. Thread the Counterweight Shaft into the hole located
directly below the Declination Lock Knob (3). Make sure that the shaft
is securely locked into mount.
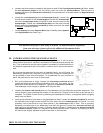
• Locate Eyepiece (17) and Diagonal Mirror (16). Carefully place Eyepiece
into Diagonal Mirror as shown (fig. b)
Your Bushnell telescope is now ready to be used. To obtain the fullest enjoyment
from your telescope, please refer to the additional information below.
III. UNDERSTANDING THE EQUATORIAL MOUNT
The equatorial mount is designed to move in any direction. It can be set to
allow manual controls to track the movements of celestial bodies across the
sky. This is referred to as diurnal movement; movement of celestial bodies in
the direction opposite to that of the earth’s rotation and is around the earth’s
axis.
By aligning the telescope’s polar axis at celestial North, you will place the
telescope in parallel with the earth’s axis and thus be able to locate stars in
the sky based on star atlas information. To compensate for your position on
earth, the polar axis is set in one of three ways:
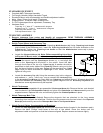
• Set up the telescope at night. Loosen the Declination Lock Knob (3) and
rotate the telescope around the declination axis until the arrow on the
declination scale points to 90 degrees. Tighten the Declination Lock Knob.
The telescope is now roughly in parallel with the polar axis.
• Loosen the Azimuth Lock Knob (8) and turn the telescope until the objective end faces due north. This
can be done by approximating the location of the pole star (Polaris or North Star) or by the use of a
compass. True North is then found by directing the telescope at Polaris, as magnetic North is slightly
away from true North.
• Look up the latitude of your area in any geographical atlas. Loosen the Altitude Lock Knob (7) and set
the latitude scale to the correct latitude for your area. Aim the Finderscope (20) at Polaris. You will
probably notice that Polaris is not dead center in the finderscope’s field of view. This is probably
because your telescope is not absolutely level with the ground. Loosen the Azimuth Lock Knob (8)
again and turn the telescope so that it is directly aimed at Polaris. Tighten both the Azimuth Lock Knob
and Altitude Lock Knob. Polaris is 1 degree of the North celestial pole. Therefore, the sighting of stars
will have to be slightly adjusted as you locate them in the heavens.
HOW TO USE YOUR NEW TELESCOPE
fig b.
17
16
15