


Page 4
8. Allow the applicator to thoroughly warm up for 10 minutes. Do not attempt to
operate the applicator until this time has elapsed.
5. Operation
Normal use:
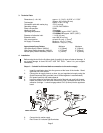
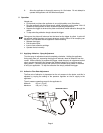
• Fit the stand and place the applicator in an upright position on a flat surface.
• Plug the applicator into the power supply socket, and switch on the power. Wait 10
minutes for the applicator to reach its normal operating temperature.
• Squeeze the trigger to advance the piston and extrude molten adhesive through the
nozzle.
• To stop extruding adhesive simply release the trigger.
During use, the piston will advance into the barrel as the trigger is pulled. A point will
be reached where the piston no longer advances, and the sound of air escaping can
be heard - this indicates that the applicator needs reloading.
• Release the trigger.
• Pull the piston back.
• Insert a new adhesive cartridge.
• Operate the tool normally.
5.1. Applying Adhesive - Spray Adjustment
Turn the spray air adjustment control completely clockwise. Holding the applicator
facing away from you, squeezing the trigger will extrude a bead of adhesive from the
nozzle. While continuing to squeeze the trigger, rotate the spray air adjustment control
slowly counter-clockwise; this changes the adhesive bead into an ever-finer spiral
spray pattern. Continue to adjust the control until a suitable spray pattern is obtained
to suit your application. To stop the adhesive flow simply release the trigger.
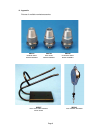
5.2. Adhesive Flow Rate Adjustment
The flow rate of adhesive is dependent on the air pressure to the piston, and this is
adjusted by varying the setting of the pressure regulator on the air supply to the
applicator.
The air pressure operating range for the applicator is:
Minimum 45 p.s.i. (3 bar)
Maximum 100 p.s.i. (7 bar)
.
USERS AIR SUPPLY