


CHARGING THE BATTERYCHARGER FROM THE WALL CHARGER
CHARGING YOUR DEVICE FROM THE BATTERYCHARGER
STORING & TRANSPORTING THE BATTERYCHARGER
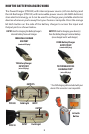
1. (Model PP2010 only) Press the front battery pod grip (A) in until it clicks,
then pull the battery pod (B) out of the bottom of the battery charger.
Insert the 4 supplied AA NiMh rechargeable batteries if they are not
already in place.
2. Press the lid latch button and pull open the top of the BatteryCharger.
3. Connect the USB cable to the micro-USB INPUT port from the USB port
on the supplied AC charger (see packing list), and plug it into a wall outlet
(100-240v).
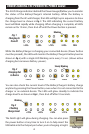
4. Press the Power button at the center of the PowerSync Power Gauge (C).
All four LEDs on the Power Gauge (Fig. 1) will light up (for 10 min.) when
the BatteryCharger’s internal battery has been fully charged (you may
leave it connected to the charger overnight without risk of overcharging),
and you’re ready to connect and charge your device.
Press the power button at the center of the PowerSync Power Gauge (C)
to check the BatteryCharger’s charge status, then connect the supplied
USB cable from the OUTPUT port of the BatteryCharger to your device to
recharge it. If your device uses a non-standard type of connector, use the
cable that came with it to connect to the BatteryCharger’s OUTPUT port.
Check the charge indicator on your device to determine when it’s ready
to use. The NiMh AA batteries inside the PP2010 may also be removed and
used to power any device that operates on AA batteries (unless the use of
rechargeable batteries is not recommended).
Close the top lid when storing or transporting the BatteryCharger, to help
keep dirt and debris out of the USB ports.
Power
Button
C
PowerSync
Power Gauge
B
NiMh AA Battery Pod
(PP2010 only)
A
Battery Pod Grip
(front side)
(PP2010 only)
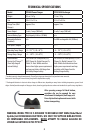
WARNING: INSERT ONLY NiMh AA
BATTERIES IN THE PP2010. NEVER
ATTEMPT TO CHARGE ALKALINES
OR LITHIUMS.
3
4