


Spraying Instructions (Cont.)
CLEARING CLOGS
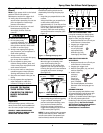
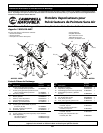
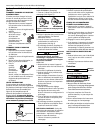
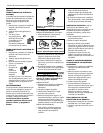
REVERSIBLE TIP: (Included)
1. Rotate the tip to the clean position
(See Figure 5).
2. Point gun in a safe direction and spray.
This should clear tip of any blockage.
3. Rotate the tip back to the spray
position and continue spraying (See
Fig. 5).
4. If clogging continues, replace gun filter
and consider straining the paint prior
to use.
Equipment
damage
can occur if a needle or sharp object is
used to clean the tip. Tungsten carbide
is brittle and can be chipped.
FIXED TIP:
1. Depressurize and turn off the unit
per manufacturer’s instructions.
2. Lock gun trigger.
3. Remove tip and tip guard from the gun.
4. Soak tip in water or appropriate
solvent and brush away old paint or
impurities with a toothbrush until
the tip orifice has been cleared.
ADJUSTABLE TIP:
1. Turn adjustment knob fully
counterclockwise to open tip to
largest spray pattern.
2. Pull trigger and spray into a bucket
or container. This should clear the tip
of any blockage.
3. If clogging continues, replace gun
filter and consider straining the paint
prior to use.
CLEANING YOUR GUN: Follow
cleaning, use and maintenance
instructions included with your paint
sprayer. After flushing the pump and
when finishing:
1. Rotate Spray Tip to the cleaning
position.
2. Release Trigger Lock.
3. Point Spray Gun into an empty waste
bucket and pull the Trigger. Spray at
least 1 gallon of fluid into waste
bucket. To reduce splashing, direct
the fluid stream along the inside of
the bucket and well above the fluid
level.
REFER TO PAINT SPRAYER SHUT-
DOWN PROCEDURES.
4. Depressurize and turn off sprayer per
manufacturer’s instructions.
5. With the gun pointed in a safe
direction, pull the gun trigger with
the trigger lock disengaged to ensure
system is depressurized.
6. Engage Trigger Lock.
7. At this point the pump and spray gun
are clean, but still require
preparation for storage. Spray Tip
Guard or any accessory being used
still require cleaning.
CLEANING SPRAY TIP GUARD:
1. Remove Spray Tip with 1” or
adjustable wrench.
2. Clean Tip Guard with a cleaning
brush.
Maintenance
Pump
damage
may occur if these instructions are not
followed.
Before
performing any maintenance, make
sure to relieve pressure from system
and disconnect power from sprayer.
• Do not use oil based solvents to
clean equipment after using latex
based coatings. Use only warm
soapy water.
• Always replace clogged gun filters,
do not attempt to clean them.
• Carefully follow cleaning and
storage instructions for your
sprayer.
• Do not use metal or other hard
objects to pick dried paint material
from Spray Tip Orifice.
TRIGGER LOCK
Pulling the trigger must
not open the gun valve
when trigger lock is
activated.
You should be able to get the actuator
to wiggle slightly with your finger
while holding the trigger against the
trigger lock when it is in the locked
position. If you cannot, adjust the
trigger position by following these
instructions:
1. Place trigger in locked orientation
(tabs horizontal).
2. With one hand holding trigger
lightly against lock, use a 1/4” nut
driver to turn nut in until trigger
starts to come off the lock.
3. Reverse the nut (counterclockwise)
1/2 turn.
TIP SEAL AND WASHER
Occasionally, you will need to replace
the silver seal and black washer located
inside the tip base.
1. To replace seal and washer, first
loosen tip base with adjustable
wrench, and then remove by hand.
2. Remove spray tip.
3. With Phillips screwdriver, push seal
and washer out from front of tip
base.
4. With flat side of seal facing up,
place seal in base. Make sure it lines
up properly with base.
5. Place washer in base. Make sure it
lines up properly with base.
6. Put spray tip back in tip base.
7. Reattach tip base to gun valve.
Make sure spray tip and
tip base fit snugly in
place. A loose fit can
lead to misdirected
spray discharge and a
skin injection hazard.
CLEAN
SPRAY
Figure 5 - Clean and Spray Position
SOLVENT
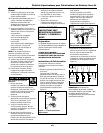
Figure 4 - Prevent Clogged Tip
4
Operating Instructions and Replacement Parts List
www.chpower.com