


Para instalar la hoja de corte:
1.Asegúrese de que la sierra esté
completamente desconectada de la
fuente de energía antes de instalar la
hoja.
2.Coloque el eje de movimiento
alternativo en la posición
completamente extendida o en una
posición en la cual el tornillo de
ajuste de retención de la hoja puede
accederse a través de la ranura en la
cubierta de caucho.
3.Inserte la llave hexagonal en el tornillo
de ajuste de retención de la hoja y
gire en sentido antihorario hasta que
el extremo roscado del tornillo quede
al ras con el anillo del retenedor de la
hoja, como se indica arriba.
4.No retire por completo el tornillo de
ajuste del anillo
5.Inserte la hoja con los dientes de
corte hacia abajo y alinee el orificio
de la hoja sobre el pasador.
6.Apriete firmemente el tornillo de
ajuste de retención de la hoja contra
la hoja.
7.Retire la llave hexagonal
8.Vuelva al funcionamiento normal.
Antes de enchufar el cable de corriente,
tire siempre de la hoja para cerciorarse
de que esté trancada de modo seguro
en el sujetador. Si no lohace podría
ocasionarle lesiones graves.
Funcionamiento
Interruptor:
Para empezar a cortar, empuje la traba
del interruptor de encendido luego
apriete el interruptor de encendido
con el dedo. La velocidad máxima se
puede ajustar con el interruptor de
velocidad variable. (Figura 3)
Interruptor de control
de velocidad:
La sierra alternativa viene equipada
con un interruptor de velocidad
variable. Este interruptor es una rueda
giratoria que tiene 12 valores de
velocidad diferentes. Utilice las
velocidades inferiores para los
materiales más blandos y delgados,
y utilice las velocidades superiores para
los materiales más duros y gruesos.
Asegúrese de que la sierra esté en el
valor de velocidad mínima antes del
encendido y después de cada uso.
Una vez que esté encendida, gire la
rueda hasta la velocidad deseada.
Permita que la sierra alcance la
velocidad seleccionada antes de
comenzar a cortar.
Hojas:
Esta sierra alternativa incluye tres
hojas diferentes. La hoja azul se usa en
general para cortar madera, la hoja
blanca trabaja mejor para cortar el
plástico, y la hoja roja se usa sobre
todo para cortar metales.
Corte general:
Se deberán usar gafas de
seguridad durante la
operación.
Sostenga la sierra con firmeza adelante
y alejada de usted. Asegúrese de que
la hoja de la sierra no tenga material
extraño y de que el cable de corriente
y el cable de extensión no estén en la
ruta de la hoja. Asegúrese de que el
material a cortar esté sujetado con
firmeza. Las piezas de trabajo pequeñas
deben sujetarse con seguridad en una
prensa o con abrazaderas al banco o
mesa de trabajo. Marque claramente la
línea de corte. Presione el interruptor
de corriente para comenzar a cortar.
Coloque la zapata en el trabajo. NO LA
FUERCE. Ejerza únicamente la presión
suficiente para mantener el corte de la
sierra. Deje que la hoja y la sierra hagan
el trabajo.
Corte por penetración:
Marque claramente la línea de corte.
Desde un punto de arranque
conveniente dentro del área de corte,
coloque la punta de la hoja sobre dicho
punto con la sierra paralela a la línea de
corte. Baje lentamente la sierra hasta
que el borde de la zapata se apoye en
la pieza de trabajo. Encienda la sierra
y permita que llegue a la velocidad
deseada. Con la sierra apoyada en la
zapata, mueva lentamente la sierra hacia
delante para bajar la hoja por la línea de
corte. Continúe con este movimiento
hasta que la hoja de la sierra esté
perpendicular a la pieza de trabajo.
Asegúrese de que la hoja no toque la
pieza de trabajo hasta que la sierra
alcance la máxima velocidad definida
en el disco de ajuste de velocidad.
Deno hacerlo podría hacerle perder el
control y resultar en lesiones graves.
Corte de metales:
Cuando corte material metálico con
esta herramienta, asegúrese de usar
una hoja afilada diseñada para este
propósito. Recomendamos lubricar la
superficie de corte con aceite para
corte para evitar la acumulación de
calor. Siga los procedimientos
generales de corte en la página
anterior. No fuerce la herramienta.
Ejerza únicamente la presión suficiente
para mantener el corte de la sierra.
Mantenimiento
No permita que líquido de frenos,
gasolina, productos a base de petróleo,
aceites penetrantes, etc. entren en
contacto con las piezas plásticas.
Éstoscontienen sustancias químicas
que pueden dañar, debilitar o destruir
la caja, comprometiendo la integridad
del doble aislamiento.
14 Sp
Manual de Instructciones y Lista de Piezas
Ensamblaje
3
DG420700CK
www.chpower.com
Keep
cutting
tools sharp and clean. Properly main-
tained cutting tools with sharp cutting
edges are less likely to bind and are
easier to control.
Use the
power
tool, accessories and tool bits etc. in
accordance with these instructions,
taking into account the working condi-
tions and the work to be performed.
Use of the power tool for operations
different from those intended could
result in a hazardous situation.
• Use clamps or another practical way
to secure and support the workpiece
to a stable platform. Holding the
work by hand or against your body
leaves it unstable and may lead to
loss of control.
• Ensure the power switch is in the OFF
position before inserting tool into
power source. Doing so with the switch
ON, may cause accidental starting.
• Use only accessories that are
recommended by the manufacturer for
your model. Accessories suitable for
one tool may create a risk of injury
when used on another tool.
• Some wood contains preservatives
which can be toxic. Take extra care to
prevent inhalation and skin contact
when working with these
materials. Request and follow all safety
information available from your
material supplier.
Reciprocating Saw Handling:
• Do not start the saw with the blade
touching any surface. The blade action
will bounce the tool and may cause
bodily injury.
• Allow the tool to come to a complete
stop before putting it down. A running
tool will jerk when the blade tip
contacts any surface.
CAUSES AND USER PREVENTION
OF KICKBACK:
KICKBACK is a sudden reaction to a
pinched, bound or misaligned saw
blade, causing an uncontrolled saw to
lift up and out of the workpiece
toward the operator.
When the blade is pinched or bound
tightly by the kerf, or cutting slot,
closing down, the blade stalls and the
motor reaction drives the unit rapidly
back toward the operator.
If the blade becomes twisted or
misaligned in the cut, the teeth at the
back edge of the blade can dig into
the top surface of the wood causing
the blade to climb out of the kerf and
jump back toward operator.
KICKBACK is the result of tool misuse
and/ or incorrect operating procedures
or conditions and can be avoided by
taking proper precautions as given in
the following:
1.Maintain a firm grip with both hands
on the saw and position your body
and arm to allow you to resist
KICKBACK forces. KICKBACK forces
can be controlled by the operator, if
proper precautions are taken.
2. When blade is binding, or when
interrupting a cut for any reason,
release the trigger and hold the saw
motionless in the material until the
blade comes to a complete stop. Never
attempt to remove the saw from the
work or pull the saw backward while
the blade is in motion or KICKBACK
may occur. Investigate and take
corrective actions to eliminate the
cause of blade binding.
3.When restarting a saw in the
workpiece, center the saw blade in
the kerf, or cut, and check that saw
teeth are not engaged into the
material. If saw blade is binding, it
may walk up or KICKBACK from the
workpiece as the saw is restarted.
4.Support large panels to minimize the
risk of blade pinching and KICKBACK.
Large panels tend to sag under their
own weight. Supports must be
placed under the panel on both
sides, near the line of cut and near
the edge of the panel.
5.Do not use dull or damaged blades.
Unsharpened or improperly set
blades produce narrow kerf causing
excessive friction, blade binding and
KICKBACK.
6.Use extra caution when making a
“Pocket Cut” into existing walls or
other blind areas. The protruding
blade may cut objects that can cause
KICKBACK.
7.The blade guard can be adjusted to
limit the length of the exposed
blade. Make sure the blade is long
enough or the blade guard is
adjusted to allow the blade to
extend past the stock. If the blade is
too short, it increases the chance of
KICKBACK. Before cutting, make
sure the blade screws are tight.
8.Be cautious of pitchy, knotty, wet or
warped stock. These are most likely to
create pinching conditions and
possible KICKBACK.
SERVICE
Have you
power
tool serviced by a qualified repair per-
son using only identical replacement
parts. This will ensure that the safety of
the power tool is maintained.
When
servicing
tools, use only identical replacement
parts. Follow instructions in the
Maintenance section of this manual. Use
of unauthorized parts or failure to follow
maintenance instructions may create a
risk of electric shock or injury.
Assembly
To install cutting blade:
1.Make sure saw is completely
disconnected from power source
before installing blade.
2.Position reciprocating output shaft to
the full extended position or in a
position where the blade retainer set
screw can be accessed through the
slot in the rubber cover
3.Insert the hex wrench into the blade
retainer set screw and turn counter
clockwise until the threaded end of
the screw is flush with the blade
retainer collar as shown above.
4.Do not completely remove set screw
from collar
5.Insert the blade with the saw teeth
down and align the hole in the saw
blade over the pin.
6.Securely tighten the blade retainer
set screw against the blade
7.Remove hex wrench
General Safety
Information (cont’d.)
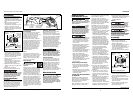
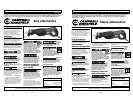
Figure 2 - Saw front view
Blade retainer
collar
Collar
retaining
screw
Blade
retainer
set
screw
Blade
alignment pin
Reciprocating
output shaft
Figura 2 – Vista frontal de la sierra
Anillo de retensión
de la hoja
Tornillo de
retensión
del anillo
Tornillo de
ajuste de
retensión
de la
hoja
Pasador
de alineación
de la hoja
Eje de movimiento
alternativo
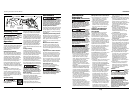
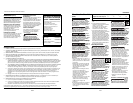
Figura 3
Botón de
seguro del
gatillo
Interruptor de velocidad variable
Interruptor
de corriente
Protección
de la hoja
Etiqueta adhesiva
de advertencia
(lado opuesto)
Orificio de acceso del tornillo
de retensión de la hoja
(2) Tornillos
de ajuste de
la guarda
de la hoja