SKU 43533 Page 6
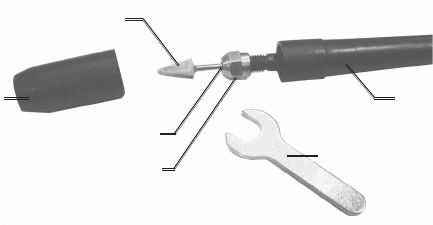
3. Slip off the Chuck Cover (49).
4. Loosen the Fixing Nut (47) with the Wrench (50).
5. Insert the Mounted Stone Bit (48) into the Chuck (46) and tighten Fixing Nut.
6. Slip the Chuck Cover (49) over the Chuck assembly.
7. Grasp the Flexible Shaft handle with one hand, and turn the Grinder ON with
the other hand.
CAUTION: Always wear ANSI approved safety glasses when grinding.
8. When finished, turn the Grinder OFF and wait for it to stop before setting
down the Flexible Shaft.
Maintenance
Dressing the Grinding Wheel
Note: New wheels frequently are not true and during operation will often become
grooved, glazed (build up), out of round, or misshapen. You will need a grinding
wheel dresser for this operation. Dressers are available from Harbor Freight Tools.
1. Stand to the side of the wheel for this operation.
2. If the wheel is new let it run for a minute with no load. If the wheel runs
straight and true, you will not need to dress it prior to operation. If it does not,
proceed with the following instructions.
3. If you are using a “pistol grip” dresser, grip the handle firmly with one hand
and the arm of the dresser with the other. Allow the wheel to reach full
speed. Use the tool rest to support your hand and the dresser, and evenly
apply the dresser to all surfaces of the wheel. The wheel can be dressed in a
few minutes.
4. If you are using an “inline” dresser, hold the handle firmly, put the dresser on
the tool rest so that its wheels can move freely (i.e., the exposed part of the
wheel should be facing up). Let the wheel reach full speed and apply the
dresser evenly to all surfaces.
Mounted Stone Bit (48)
Chuck Cover (49)
Chuck (46)
Fixing Nut (47)
Wrench (50)
Flexible Shaft (32)


