


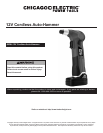

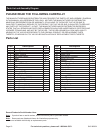

Page 7For technical questions, please call 1-800-444-3353.SKU 68364
Operating Instructions
Read the ENTIRE IMPORTANT SAFETY
INFORMATION section at the beginning
of this manual including all text
under subheadings therein before
set up or use of this product.
Tool Set Up
TO PREVENT SERIOUS INJURY FROM
ACCIDENTAL OPERATION:
Release the Trigger and disconnect Battery Pack
before adjusting tool or installing accessories.
Work Piece and Work Area Set Up
1. Designate a work area that is clean and well-
lit. The work area must not allow access by
children or pets to prevent distraction and injury.
2. Route the power cord along a safe route to reach
the work area without creating a tripping hazard or
exposing the power cord to possible damage. The
power cord must reach the work area with enough
extra length to allow free movement while working.
3. Secure loose work pieces using a vise or clamps
(not included) to prevent movement while working.
4. There must not be objects, such as utility lines,
nearby that will present a hazard while working.
Charging
1. Place the Battery Pack on a dry reproof surface in
a room where the temperature is from 50–104° F.
Note: If recharging a newly spent Battery Pack, allow it to
cool completely before charging.
Make sure the Battery Pack is undamaged; do
not charge a cracked or leaking battery pack.
2. Disconnect the Cord from the Battery Charger. Attach
the Adapter plug to a grounded, 120 V~, 60 Hz outlet.
3. Plug the Charger into the power supply. The
red light on the Charger will light, showing
that power is supplied to the Charger.
4. IMPORTANT: When Battery is fully charged, the
red light will continue to stay lit. WARNING!
Do not leave unattended while charging.
Note: The Battery Pack’s capacity will increase
somewhat during the rst few charging cycles.
A fully discharged battery will take about 3 to 5
hours to fully charge. CAUTION! Recharging the
Battery Pack for more than 5 hours can damage
the battery cells. Keep track of charging time.
5. While charging, the Battery Pack and Charger,
and Adapter may become warm to the touch. This
is normal, and does not indicate a problem.
6. Unplug the Charger and disconnect it from
the Battery Pack when nished.
7. Allow the Battery Pack to cool
completely before using it.
8. Press the Battery Tabs to release Battery Pack from the
Charger (or when removing it from the Auto Hammer).
9. Store the Charger and Battery Pack indoors, out of
reach of children. WARNING! Do NOT use a different
Charger or Battery to power this Auto Hammer.
General Operating Instructions
TO PREVENT SERIOUS INJURY FROM
ACCIDENTAL OPERATION:
Release the Trigger and disconnect Battery Pack
before adjusting tool or installing accessories.
• DO NOT install the Battery Pack until
AFTER you complete the following steps
to set up the Auto Hammer for use.
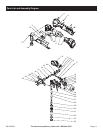
• Refer to page 6 for the location of the parts of
the Auto Hammer for the following steps.
1. The Auto Hammer is designed to accept up to 2-1/2”
long nails. Do not use larger nails with this Auto
Hammer as damage to the tool, nail or workpiece may
occur. Only use to hammer nails into wood, drywall
and/or particle board.
CAUTION: This tool is not intended for framing or other
heavy-duty applications. Larger 2-1/2” nails may take
longer to completely drive, especially in harder wood.
WARNING! Do not use Auto Hammer for
hammering nails into metal or concrete.
2. To load nails, hold the Auto Hammer rmly and
keep your ngers away from the Trigger.
3. With the Auto Hammer’s nose pointed away from you,
feed a nail into the magnetic sleeve. The sleeve will
hold the nail in place until you are ready to drive the
nail into the workpiece.
WARNING! Keep the Auto Hammer pointed away
from yourself and others when loading nail. Do
not load nail while pressing the Trigger.