


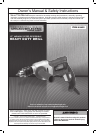


Page 9For technical questions, please call 1-800-444-3353.Item 69452
Operating Instructions
Read the ENTIRE IMPORTANT SAFETY INFORMATION section at the beginning of this
manual including all text under subheadings therein before set up or use of this product.
Tool Set Up
TO PREVENT SERIOUS INJURY FROM ACCIDENTAL OPERATION:
Disengage the Lock Button, release the Trigger and unplug the tool from its
electrical outlet before adjusting tool or installing accessories.
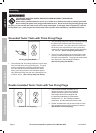
1. Loosen the Chuck with the Chuck Key until the jaws
of the drill are opened enough to fit the drill bit.
2. Insert the drill bit (sold separately) all
the way into the opening and tighten it
securely in place with the Chuck Key.
3. With heavy leather gloves on, tug on the bit to
make sure it is securely attached. Check that it is
installed straight in the center of the chuck opening.
Note: Use sharp bits. Dull, bent, or damaged bits may
cause stress on the drill and break causing injury.
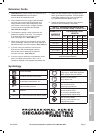
Workpiece and Work Area Set Up
1. Designate a work area that is clean and well-
lit. The work area must not allow access by
children or pets to prevent distraction and injury.
2. Route the power cord along a safe route to reach
the work area without creating a tripping hazard or
exposing the power cord to possible damage. The
power cord must reach the work area with enough
extra length to allow free movement while working.
3. Secure loose workpieces using a vise or clamps
(not included) to prevent movement while working.
4. There must not be objects, such as utility lines,
nearby that will present a hazard while working.
General Operating Instructions
1. Plug the Power Cord into a 120V~60Hz outlet.
2. Slide the Directional Switch to the forward setting.
3. Place the tip of the drill bit on the workpiece.
4.
and slowly squeeze the Trigger.
5. To lock the Drill on, press and hold the Trigger
then press the Lock ON Button. Release the
Trigger then the Lock ON Button. Press and
release the Trigger to turn the Drill off.
6. Allow the bit to cut the hole.
7. Remove the bit from the finished hole then release
the Trigger, or press and release the Trigger if the
Lock ON Button is engaged. Wait for the Drill to come
to a complete stop before laying the tool down.
8. To prevent accidents, turn off the tool and
disconnect its power supply after use. Clean, then
store the tool indoors out of children’s reach.
CAUTION! The bit may be hot to the touch.
Allow the bit to cool before removing.
Note: If a bit becomes wedged into workpiece,
stop and slide the Directional Switch to the
reverse setting. Then slowly squeeze the
Trigger to back the bit out of the workpiece.
Note: When drilling wood, plastic or plastic coated chip
board, place bit at point to be drilled. When drilling metal,
use a punch (sold separately) to mark the drilling position.
Use a lubricant to the prolong life of bit and increase
drilling action with most metals. With steel, tin, and sheet
metal use a light machine oil, with aluminum, use paraffin.
Do not use lubricants with brass, copper, and cast iron.
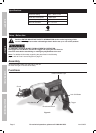
SAFETYOPERATIONMAINTENANCE SETUP