in its “OFF” position, the Battery (40) is removed from the Impact Driver, and the Charger
(46) is unplugged from its electrical outlet prior to making any adjustments to the tool.
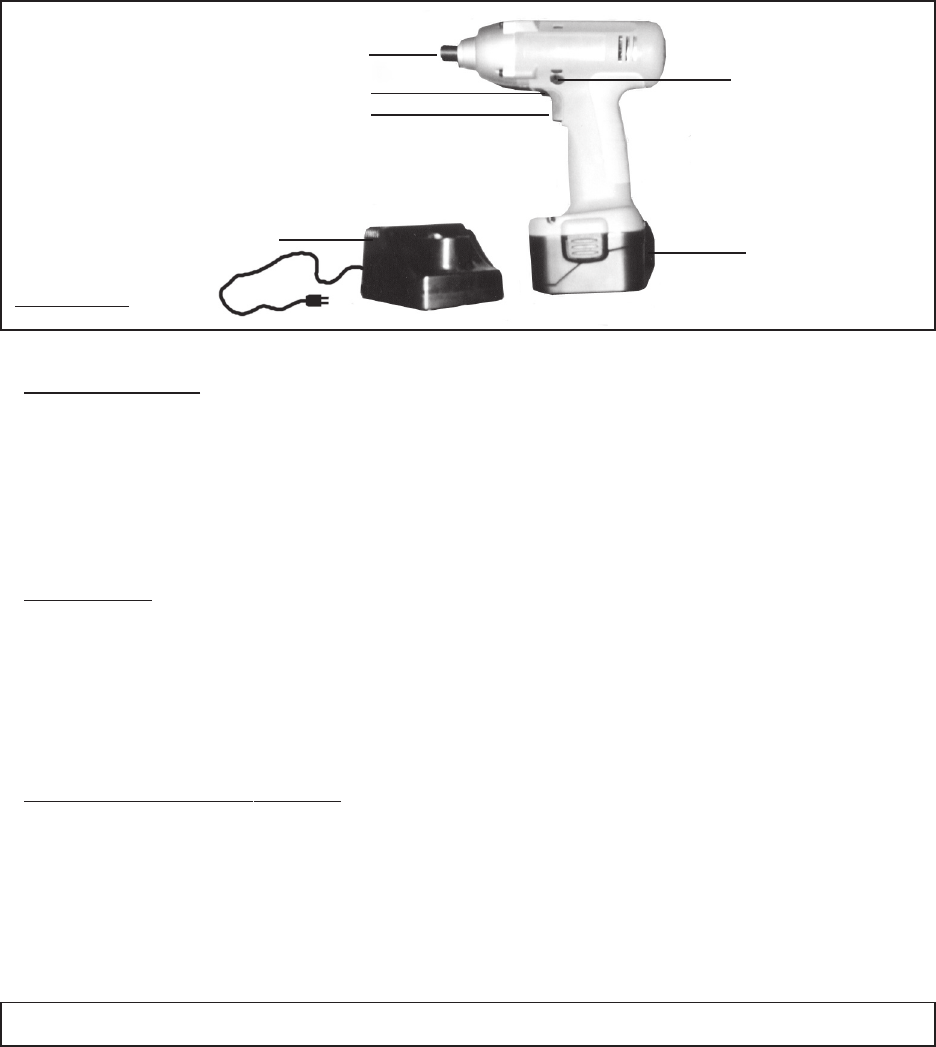
(See Figure A.)
2. Lock Sleeve (9): Accepts the 1/4”
shank
diameter Double End Screwdriver (39), 1/4”
Socket (42), 5/16” Socket (43), 3/8” Socket (44), and 15/32” Socket (45). To install the
Screwdriver or Sockets with the Impact Driver pointed away from your body, pull back on
the Lock Sleeve. Insert the shank of the Screwdriver or Socket all the way into the Lock
Sleeve. Then, release the Lock Sleeve to hold the Screwdriver or Socket in place.
(See Figure A.)
SKU 92472 For technical questions, please call 1-800-444-3353 PAGE 7
3. Trigger (34): The Trigger is operated
manually
simply by squeezing the Trigger to turn on
the Impact Driver and releasing pressure on the Trigger to turn off the Driver. The Trigger
features a Trigger Lock for continuous running of the Impact Driver. To set the Impact
Driver in a continuous run mode, squeeze the Trigger and depress the Trigger Lock.
Then, release pressure on the Trigger. The Impact Driver will continue to run. To turn off
the Impact Driver, squeeze and let up on the Trigger. (See Figure A.)
4. Forward/Reverse Lever (37): The Forward/Reverse Lever allows you to change the
rotational direction of the Impact Driver. To change the rotational direction, make sure
the Impact Driver is at a complete stop. While holding the tool in your hand, for a
clockwise
rotation, move the Lever to the
right
. For a
counterclockwise
rotation, move the Lever to
the
left
. (See Figure A.)
LOCK SLEEVE (9)
FORWARD/REVERSE LEVER (37)
TRIGGER (34)
TRIGGER LOCK
BATTERY (40)
CHARGER (46)
FIGURE A
TO CHARGE THE IMPACT DRIVER
1. NOTE: The Battery (40) requires charging. (See Figure A.)
2. When the Battery (40) requires recharging, a 1- 1-1/2 hour charge allows the tool to


