


Page 7SKU 95573
For technical questions, please call 1-800-444-3353.
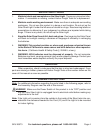
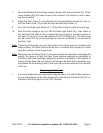
To change the batteries, carefully remove the Solar Panel (1) from the Bracket (8)
by turning the Bracket Knobs (9) counterclockwise. Place the Solar Panel assembly
on a flat, uncluttered surface.
Remove the battery covers from Battery Housing (4) by pressing the battery cover
tabs inward, while pulling them up and out.
Battery (3)
Back View of
Solar Panel
Remove the old batteries (note the polarity position of the old batteries). Make
certain that the new batteries are “AA” (1.2-VDC, 500-mAH, Ni-CD) rechargeable.
Install the new batteries into the Battery Housing (4). Make certain that the batteries
are placed according to the correct polarity marked on the batteries. The negative
polarity (-) of the battery goes against the spring. Make sure the batteries stay in
the grooves. Be very careful not to crimp the wires.
Replace the battery covers and re-attach Solar Panel (1) to the Bracket (8) using
the Bracket Knobs (9) on each side of the Solar Panel (1). See Figure 3 .
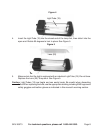
Replacing the Light Tube
Before performing any maintenance on the Solar Shed Light, make certain that the
switch on the Shed Light is in the “OFF” position and that the Light Tube (19) has
had time to completely cool off.
Remove the Lens (20) from the Shed Light by lightly squeezing it and gently lifting
and slide off. See Figure 4.
Gently grasp the old Light Tube (19). Turn it 90 degrees (either direction). Slide one
end out of the OPEN side of the lamp. (One side of the lamp is open, the other is
closed). Pull out the old Light Tube. Dispose of it according to warnings on page
7. See Figure 4.
2.
3.
4.
5.
1.
2.
3.
Figure 3