


SKU 96298 For technical questions, please call 1-800-444-3353. PAGE 11
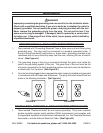
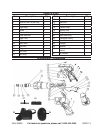
The different sizes of screws pictured on the Torque Ring are an indication of how
much torque the Cordless Driver will apply to the bit before the clutch slips, allowing
the bit to stop and helping to prevent damage to the screw, bit, or workpiece. The
larger the screw, the more torque is applied before the clutch slips. Always start
with a lower torque to help prevent damage. This Cordless Driver also has torque
settings between the screw markings to allow a greater range of selection.
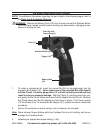
Set the driving torque by turning the Gear Box with Torque Ring (2) so that it lines
up with the Arrow on the center top of the Cordless Driver.
When driving in light gauge metal or wood, use a wooden block to back up the
material and prevent damage to the workpiece.
Mark the center of the hole for the screw with a center punch (not included) to give
a Bit a start and to prevent it from “walking”.
Insert the fully charged Battery Pack (19) into the handle of the Cordless Driver.
The Rotation Button (6) allows you to change the rotational direction of the Cord-
less Driver. For a clockwise rotation, move the Rotation Button to the right. For a
counterclockwise rotation, move the Rotation Button to the left. The center position
locks the Trigger (12) to prevent the Cordless Driver from operating.
Hold the Cordless Driver firmly with both hands, as torque from the Motor can cause
the tool to twist.
Operate the Driver by squeezing the Trigger (12). The speed can be controlled by
varying the pressure on the Trigger.
If the clutch starts slipping before the screw is in all the way, stop the driver, put the
Rotation Button (6) in the center position and change the torque setting. Reset the
rotation direction before continuing.
Release the Trigger (12) to stop the Driver, put the Rotation Button in the center
position, and remove the bit from the Bit Adapter.
INSPECTION, MAINTENANCE, AND CLEANING
WARNING! Remove the Battery Pack (19) from the tool and set the Rota-
tion Button (6) to the center, locked, position before performing any inspection,
maintenance, or cleaning.
BEFORE EACH USE, inspect the general condition of the Cordless Driver. Check
for misalignment or binding of moving parts, cracked or broken parts, leaking Bat-
tery Pack, damaged Charger wiring, chipped or broken Bits, and any other condition
that may affect its safe operation. If abnormal noise or vibration occurs, have the
problem corrected before further use.
Do not use damaged equipment.
4.
5.
6.
7.
8.
9.
10.
11.
14.
1.
2.