


Page 4SKU 96996
For technical questions, please call 1-800-444-3353
Warning: The warnings, cautions, and instructions discussed in this instruction manual cannot cover all
possible conditions and situations that may occur. It must be understood by the operator that common
sense and caution are factors which cannot be built into this product, but must be supplied by the
operator.
Unpacking
When unpacking, check to make sure the parts listed on page 6 are included. If any parts are missing
or broken, please call Harbor Freight Tools at the number on the cover of this manual as soon as possible.
Operation
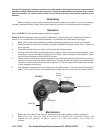
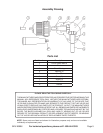
Refer to FIGURE 1 below and the Assembly Drawing on page 6.
Warning! Before attaching or removing the Drill Attachment, unplug the drill (not included) from the power
source. If it is a cordless drill, first remove the battery. If a pneumatic drill, disconnect it’s air supply.
1. Read and fully follow the manufacturer’s safety and operating directions for the drill (not included).
2. Open the chuck on the drill (not included), and insert the Shaft (8) securely into the chuck. Tighten the
chuck securely.
3. Thread the Handle (9) into the hole on either side of the Drill Attachment.
4. To install a Drill Bit, hold the Chuck Sleeve firmly in place and turn the Chuck counterclockwise. Insert
the shank of a bit (not included) all the way into the Chuck. While holding the Chuck Sleeve in place,
turn the Chuck clockwise to lock the Drill Bit in place.
5. Always use both hands while using this Attachment (one hand on the Handle (9) and the other hand on
the hand of the drill used with the Drill Attachment.) Operate the drill according to the manufacturer’s
instructions. Be careful to avoid letting the bit get stuck, as this will cause the Drill Attachment and drill
to twist, possibly causing injury.
6. After operation, unplug the drill (not included) from the power source. If it is a cordless drill, remove the
battery. Then, turn the Chuck (2) counterclockwise to open the jaws of the Chuck and remove the bit.
Maintenance
1. Before each use, clean off the Shaft (8). Make sure it has no dirt, grease, or debris clinging to it.
2. Before each use, open the jaws of the Chuck (2) following the instructions above, and
remove any dir t, grease, or debris. Store it in a cool, dr y location, out of reach of
children.
FIGURE 1
Shaft (8)
Handle (9)
Jaws of Chuck (2)
Chuck (2)
Chuck
Sleeve