


SKU 91780 Page 6For technical questions, please call 1-800-444-3353.
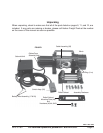
Installation
Warning! Injury or death can occur if this Winch comes apart from its mounting location
when it is under load. Electrical damage or fire may occur if the Winch is wired improp-
erly. For these reasons, it should only be installed by a qualified technician.
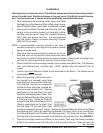
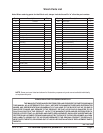
1. After matching up the mounting holes, attach the Roller
Fairlead (2w) to the Mounting Plate (46w) using the sup-
plied M12 Bolts (43w), Nuts (44w), and Washers (45w).
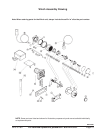
2. Now mount the Roller Fairlead and Mounting Plate as-
sembly to the mounting channel (not included) or other
suitable mounting point using the included hardware
(M10, bolt, lock washer, and nut). It is recommended
that the Harbor Freight Universal Mounting Channel
(SKU 90476) be used.
NOTE: If recommended mounting channel is not used, a
mounting channel or mounting point of equal or greater
design, must be used.
3. Now place the mounting channel in position on the ve-
hicle and mark on the vehicle’s frame where the holes
will need to be drilled for the winch’s mounting hardware. Remove the mounting chan-
nel from the vehicle and drill the holes for the mounting channel.
4. Attach the Winch to the mounting channel (not included) using Bolts (3w), Flat Washers
(5w), Lock Washers (4w), and Nuts (6w). NOTE: Tighten bolts to at least 35 ft. lbs. of
torque.
5. Connect the
short Solenoid Cables to the terminals on the Winch. The cables can be
connected to either terminal.
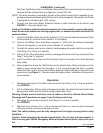
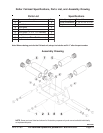
6. Mount the Solenoid (34w) to the mount-
ing channel (not included) using three
Lock Washers (4s) and three Nuts (3s).
The Solenoid may also be mounted to
the Winch motor using the included So-
lenoid mounting bracket (7s). Remove
both Bolts (12-1w) and Nuts (13w) from
the Motor End Bearing Ass’y (33w). Then
align the Solenoid Bracket (40w) with the
2 mounting holes. Attach the Solenoid
bracket to the Motor End Bearing Ass’y
(33w) by reattaching the Tie Bars (10w)
with the Bolts (12-1w) and Nuts (13w)
that were previously removed. Tighten. Secure the Solenoid Bracket (40w) to the Motor
End Bearing Ass’y (33w) by attaching the Bracket Tie Down Strap (41w) around both
the Solenoid Bracket and the Motor End Bearing Ass’y. Pull Strap until secure. Attach
the Solenoid to the bracket using the Lock Washers (4s) and Nuts (3s). See FIGURE 3.
7. Place the mounting channel and Winch on the vehicle. Now align the holes previously
drilled in the vehicle frame with the holes in the mounting channel. Using four each of
REV 11/04; 05/05
FIGURE 3