


EN
ENGLISH
-16-
Clarke
®
American Sanders
Operator's Manual (EN) - Floorcrafter
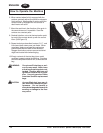
2. Drive the adjusting screw in, to sand heavier on
the left (the drive belt side). Back the adjusting
screw out, to sand heavier on the right (the side
opposite the drive belts). Test the setting on an
even surface. Make further adjustments if
necessary.
3. Mark new pointer location on main frame
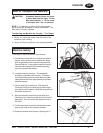
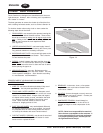
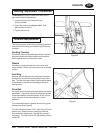
Belt Tracking
NOTE: The sanding belt should run evenly on the
face of the contact wheel. For this, the outer edge of
the sanding belt must be .09 inches (2mm) out from
the end of the contact wheel. This provides optimum
transition between "passes".
WARNING: Injury to the operator could
occur if any machine adjust-
ments are made while the
motor is running. Do not
attempt to make any adjust-
ments while the machine is
plugged in or running.
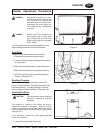
To adjust the belt tracking follow this procedure:
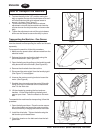
1. Locate the belt tracking adjuster screw. (See
figure 18A)
2. Hold the belt tracking adjuster screw and loosen
the locknut. (See figure 18B).
3. Rotate the tracking adjuster screw counterclock-
wise to move the belt in.
4. Rotate the tracking adjuster screw clockwise to
move the belt out.
5. Test adjustment and tighten the locknut.
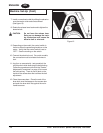
Operating Control
To increase the travel or extend the reach on the grip
control follow this procedure:
1. Loosen the locknut on the control rod.
(See figure 19A)
2. Screw the control rod adjuster (See figure 19B)
"In" until the desired reach is found.
3. Tighten the locknut.
Figure 19
Figure 18
AA
AB
AA
AB
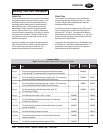
Sander Adjustment Procedures