


KNOW EVERYTHING ABOUT THE INFINITI HAIR DESIGNER PRO BY CONAIR
™
KNOW EVERYTHING ABOUT THE INFINITI HAIR DESIGNER PRO BY CONAIR
™
KNOW EVERYTHING ABOUT THE INFINITI HAIR DESIGNER PRO BY CONAIR
™
KNOW EVERYTHING ABOUT THE INFINITI HAIR DESIGNER PRO BY CONAIR
™
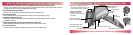
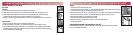
GETTING THE DRYER READY
1. Attach the straightener attachment.
2. Select the tension setting recommended for your hair type using the Tension Control Dial
located on the side of the straightener attachment. Expert's advice: The first time you use the
attachment, set it at tension 4 (strongest tension) to familiarize yourself with the Infiniti Hair
Designer Pro by Conair
™
. Gradually decrease the tension setting until you find the best
setting for your hair type.
3. For best results, use the appliance set at high setting (Speed/temperature).
4. Using the release lock buttons set attachment at desired angle for professional, salon styling results.
Use CAUTION when changing settings while in use as straightening attachment tension control dial may be hot.
INFINITI HAIR DESIGNER PRO BY CONAIR
™
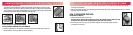
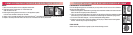
STRAIGHTENING TRIPLE ACTION STYLING PRINCIPLE
The patent-pending straightener attachment dries, straightens and shines your hair in just one simple step. The unique principle
integrates the new dual row plates combined with the 3 essential steps for twice the straightening performance and perfect results:
1. A flocked detangling comb distributes your hair among the center Nano Silver Tourmaline Ceramic
™
straightening plates while adding shine.
2. Each Nano Silver Tourmaline Ceramic
™
plate is then able to straighten efficiently using tension to
smooth out curls, eliminate static and control frizz.
3. The taller row of straightening plates allows you to get closer to the roots.
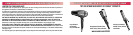
HOW TO USE THE 360
O
ROTATING HEAD ATTACHMENT
To carry out the 3 steps effectively, the straightener attachment rotates 360
o
into 8 different positions.
To change the position, press the 2 attachment release lock buttons on each side of the
barrel, turn the attachment, and then release the buttons rotating the attachment until it
‘clicks’ into place. Do not force rotation without using attachment release lock buttons.
1
2
3