


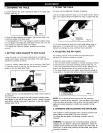
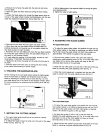

d. When the correct adjustment is reached, lock the rear roller
guide in position with the guide adjusting screw (D) Fig.16
Guide adjusting
screw (C)
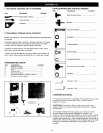
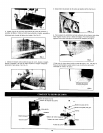
9. CHANGING THE DRIVE BELT
a. Release the saw blade tension by turning the blade tension
knob on the top of bandsaw counterclockwise.
b. Using a M6 hex. "L" wrench (not 15rovided)to release the hex.
socket head cap screw on motor mounting flange. (See Fig. 17)
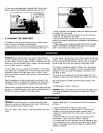
c. Using a clip pliers (not provided) remove the retaining ring from
the center of the lower wheel.
d. Carefully slide the lower wheel forward and at the same time
release the saw blade from this wheel.
e. Remove the old drive belt and fit the new belt. (ensure ribs in
drive belt are seated correctly before reassembling and tensioning
the drive belt)
f. Follow procedures for CHANGING AND ADJUSTING THE SAW
BLADE & TRACKING THE BANDSAW BLADE, before restoring
power to the bandsaw and setting up for use.
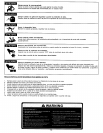
WARNING: Before starting check if any part of your bandsaw is
missing, malfuctioning, has been damaged or broken.., such as
the motor switch, or other operation control, a safety device or the
power cord, turn the bandsaw off and unplug it until the particular
part is properly repaired or replaced.
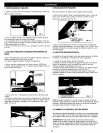
The saw blade cuts on a continuous downstroke, To avoid injury
when hands are unavoidably near to the saw blade, they should
be placed on either side of the blade, not in line with it. Use a
push stick whenever possible when working in close proximity to
the saw blade.
Start the bandsaw by turning the lock switch on and wait for the
bandsaw to come to full speed before starting to cut. Never start
the bandsaw with the workpiece in contact with the saw blade.
Slowly feed the workpiece towards the saw blade, putting only light
pressure on it. With both hands, firmly hold the workpiece down on
the table, and feed it towards the saw blade slowly.
For best results the saw blade must be sharp. Select the right saw
blade for the job, depending on_tthe thickness of the wc.od the cut to
be made. The thinner and harder the wood, the finer the teeth of
the saw blade. Use a fine tooth blade for cutting sharp curves.
The machine is especially suited for cutting curves, but will also
make straight cuts. Do not attempt to turn the workpiece without
pushing it, as this may cause the workpieee to get stuck, or the
saw blade to bend.
The rip fence is to enable safe and accurate straight cuts of the
workpiece, usually in the same direction as the grain of the timber.
The miter gauge is to enable safe and accurate crosscut of the
workpiece.
The tiltable table is used for bevel cuts.
WARNING: When sawing with the rip fence and a tilted table, the rip
fence must be installed on that side of the table which is tilted
downward.
WARNING: To avoid injury due to unexpected starting, before
cleaning or carrying out maintenance work, switch off and discon-
nect the bandsaw from the power source.
Never use water or other liquids to clean the bandsaw. Use a dry
brush.
Regular maintenance of the bandsaw will prevent unnecessary
problems.
a. Keep the table clean to ensure accurate cutting.
b. Keep the outside of the machine clean to ensure accurate
operation of all moving parts and prevent excessive wear.
c. Keep the ventilation slots of the motor clean to prevent it from
overheating.
d. Keep the inside (near the saw blade, etc.) clean to prevent
accumulation of dust. Use dust collection if possible.
e. To prolong the life of the saw blade, when the bandsaw is not in
use for extended periods, release the saw blade tension. Before
reusing the bandsaw ensure that the blade is re-tensioned and
tracking is checked.
8