


Operating Procedures
Filling the Portable Air Tank
Take your portable air tank to any source of clean dry
compressed air. A full service gas station or truck stop is
preferable. Modern convenience mart type filling stations
do not have sufficient air pressure available to allow you
to get the most from your air tank. It is recommended
that you fill your tank with air until the pressure gauge
reads between 95 to 135 psi. The air tank is filled like a
car tire by pressing the chuck from the source to the filler
valve. PLEASE NOTE: Tank can be filled and the
pressure gauge can be read with the RED ON/OFF
KNOB in the OFF position.
Using the Portable Air Tank
Turn the RED ON/OFF KNOB counter-clockwise to the
open position to allow air to flow from the tank into the
hose. To prevent air from leaking out of the tank between
uses, turn the RED ON/OFF KNOB clockwise to the
closed position.
Storage
STORING YOUR PORTABLE AIR TANK
Turn the RED ON/OFF KNOB CLOCKWISE to the OFF
position when storing your air tank.
Failure to remove condensation will cause the tank to
rust prematurely.
Always drain the tank of all air after the last use for the day
and before repairing or removing any component parts.
Point the safety pressure relief valve AWAY FROM YOUR
BODY when releasing air. Use the pull ring on the safety
relief valve to vent any pressure inside the tank before
attempting to service the tank. Safety goggles must be
worn at all times for eye protection.To disperse any
accumulated condensation inside the tank, begin by
reducing the air pressure inside the tank by pulling out on
the safety valve and holding until the tank gauge reaches
25 psi. Invert the tank with the manifold facing downward
and pull the ring on the safety relief valve. We as the
manufacturer and you as the consumer have no control
over the moisture content of air coming from any fill
source. Premature rusting caused by condensation inside
the tank is the primary reason for the suggested
replacement date stamped on the tank.
Never attempt to remove any components while tank is
pressurized.
Never remove or deface the information sticker on tank.
• Never attempt to fill the tank if any air leak is detected
in the tank body. Discontinue use of the air tank immediately.
Warranty is void if any attempt is made to alter or
change the design of the tank.
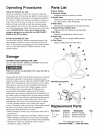
Parts List
O Carry Handle
Pressure Gauge
Indicates internal air pressure of tank.
@ On/Off Valve
Prevents air from leaking out of the air hose and/or
tire chuck, when in the off position.
O Filler Valve
Fill tank with compressed air through this point.
@ Safety Pressure Relief Valve
Prevents tank from being over-pressurized.
O Air Hose
Delivers compressed air from the tank.
O Steel Legs
Support tank in an upright stable position.
@Tire Chuck
Used to inflate tires and other items.
Manifold Enlargement
0
Replacement Parts
Item No(s). Part No. Description
2 E100179 Pressure Gauge
3, 4, & 5 E100177 Manifold Assembly
6 & 8 E100178 Air Hose w/Chuck
1
1
1
For replacement parts call
1-800-4-MY-HOME ® (1-800-469-4663)