


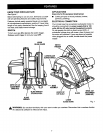

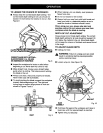
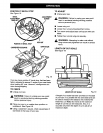


TO POCKET CUT
See Figure 20.
,_ WARNING: Always adjust bevel setting to zero
before making a pocket cut. Attempting a pocket
cut at any other settingcan result in loss ofcontrol
of your saw possiblycausing serious injury.
Adjust the bevel setting to zero, set blade to correct
blade depth setting, and swing the lower blade guard
up using the lower blade guard handle.
Always raise the lower blade guard with the
handle to avoid serious injury.
While holding lower blade guard by the handle, firmly
rest the front of the base flat against the workpiece
with the rear of the handle raised so the blade does
not touch the workpiece. See Figure 20.
LOWER
BLADEGUARD
POCKETCUT
LOWERBLADE
GUARDHANDLE Fig. 20
Squeeze the switch trigger to start your saw. Always
let the blade reach full speed then slowly lower
blade Into the workplece until base is flat against
workpleee.
After you complete your cut release the trigger and
allow the blade to come to a complete stop. After the
blade has stopped, remove it from the workpiece.
Corners may then be cleared out with a hand saw or
sabre saw.
_ WARNING: Never tie the lower blade guard in a
raised position. Leaving the blade exposed could
lead to serious injury.
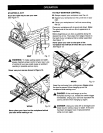
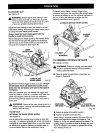
TO RIP CUT
OPTIONAL RIP GUIDE (EDGE GUIDE)
See Figure 21.
Use a guide when making long or wide rip cuts with
your saw. An optional rip guide with a five inch scale is
available at your Sears Retail Store or you can make
an efficient rip guide by clamping a straight edge to
your workpiece. Secure the workpiece. Using
C-clamps, firmly clamp a straight edge to the
workpiece and guide the saw along the straight edge
to achieve a straight rip cut. Do not bind the blade in
the cut. If using the optional rip guide, see the
following instructions and Figure 22.
ALTERNATEMETHODFORRIPCUTTING
STRAIGHT
EDGE
C-CLAMPS
WORKPIECE
Fig. 21
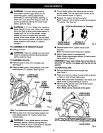
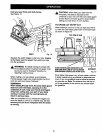
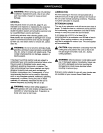
TO ASSEMBLE OPTIONAL RIP GUIDE
• Unplug your saw.
_ WARNING: Failure to unplug your saw could
result in accidental starting causing possible
serious personal injury,
• Place rip guide through holes in saw base as
shown in Figure 22.
15
EDGEGUIDE PLACERIP
GUIDETHRUHOLES
Fig. 22
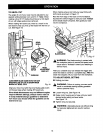
• Adjust rip guide to the width needed.
• Tighten rip guide screw securely.
When using a rip guide, position the face of the rip
guide firmly against the edge of workpiece. This
makes for a true cut without pinching the blade. The
guiding edge of workpiece must be straight for your
cut to be straight. Use caution to prevent the blade
from binding in the cut.