


11o DO NOT leave this tool on unattended_
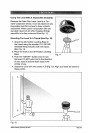
!2. When using the Magstic adhesive material for mounting the tool to a smooth
surface, ALWAYS make sure to place the "tool-side" of the adhesive to the
tool first and then position the tool on the wall in the desired location. The
Magstic material is intended for temporary hands-free use° Do not leave the
tool mounted to the wall using Magstic for extended periods of timer The tool
may fall from the wall resulting in damage to the toolo
13., Magstic is designed for temporary use on smooth, non-porous wall surfaces_
DO NOT use Magstic on porous, heavily textured or wall-papered surfaces_
The tool may fall from the wall resulting in damage to the tool.
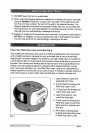
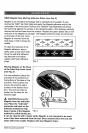
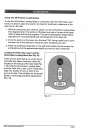
Know Your Palm Grip Laser Level (See Fig,l)
Your Craftsman Palm Grip Laser Level isa highly versatile laser tool that enhanc-
es the traditional pencil, carpenter's mark, and chalk lineo tt can be hand-held,
magnetically mounted, Magstic ® mounted to a smooth walt surface or leveled on
a horizontal surface or tripod stand and provides a laser guide line on your work-
ing area. This marking and leveling tool is easy to use in many applications from
simple home decorating projects to professionally installed cabinets, counter
tops, hand rails, banisters, etco The Palm Grip Laser Level is not calibrated as a
measuring device and should not be used as such° It will give a precise reference
mark when used as a hand-held, wall mounted tool, or tripod mounted tool
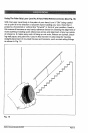
Fig,, 1
1. Laser Aperture: Laser line
projected from here.
2oX-Vial: Used for leveling the
Palm Grip Laser Level.
3. Y-Vial: Used for leveling the
Palm Grip Laser Level.
4_ Laser Push Button: Turn
on/off the laser lighL
5. Z-Vial: Used for leveling the
Palm Grip Laser Level when
laser level is in vertical posi-
tion only_
6 All-Position Leveling Base:
leveling and supporting base
of Palm Grip Laser Level.
48291 Manual Revised 06-0cj07 Page 4