


EXTENSION CORDS
• The use of any extension cord will cause some drop
in voltageand loss of power.
• Wires of the extension cord must be ofsufficientsize
to carry the current and maintain adequate voltage.
• Use the table to determine the minimum wire size
(A.W.G.) extension cord.
• If the extension cord is worn, cut, or damaged in any
way, replace it immediately.
EXTENSION CORD LENGTH
Wire Size A.W.G.
Up to 25 ft................................ 18
NOTE: Using extension cords over 25 ft. long is not
recommended.
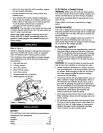
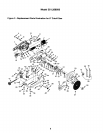
Refer to Figures 2 and 3.
The 6" Cutoff saw is used for cutting hard and soft
metals. The cutoff saw features a lightweight frame of
plastic and aluminum construction and a stamped steel
base to ensure durability.
Vise jaws can turn 0-45° for making angle cuts. Movable
jaw has rapid approach and withdraw capability.
SPECIFICATIONS
Jaw opening ............................. 33/4"
Jaw height ............................... 13/8"
Abrasive wheel diameter ................. 150mm
Abrasive wheel inner diameter .............. 22mm
Abrasive wheel thickness ................... 2mm
Abrasive wheel speed (no load) ......... 7500 RPM
Overall dimensions ................ 6'/, x 133/,x 8"
Weight ................................ 12 Ibs
Capacity at 90°: ............. Round = 2" Diameter
Rectangular = 23/8x 1'/,"
Square = 1'/2"
Capacity at 45°: ............ Round = 1'/2"Diameter
Rectangular = 15/8x 1'/8"
Square = 1'/2"
SAFETY PRECAUTIONS
WARNING: Always observe the followingsafety pre-
cautions.
• Whenever adjustingor replacing any parts on the
cutoff saw, remove plug from powersource.
• Use a clean abrasive wheel. Replace chipped or
clogged wheels.
• Use abrasive wheels rated for saw speed
• Secure the workpieca in a stable position.
• Check that all guards are attached.
• Check t_at there isno debrison wheel or insideblade
guard.
• Keep hands away from the abrasive wheel and all
moving parts.
• Always wear eye protection or face shield.
CLAMPING WORKPIECE
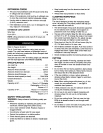
Refer to Figure 3.
The vise is designed to keep the workpiece steady
while it is being cut. The proper position will help pro-
duce a safe and accurate cut.
• The entire length of long work should be supported.
Do not balance work on base. Use supports to
prevent the work from falling off after the cut.
• Vise jaw with protractor (Key No. 36) can be adjust-
ed from 0° to 45°. To change the angle of cut loosen
two socket head bolts (Key No. 45), adjust vise jaw
to desired angle and tighten socket head bolts.
• Raise lead nut (Key No. 39) off lead screw (Key No.
41). Pull lead screw out to open vise.
• Set workpiece between vise jaws. Push lead screw in
to clamp vise jaws onto workpiece. Lower lead nut to
engage lead screw. Tighten lead screw. Make sure
workpiece is securely clamped.
• Check workpiece position by lowering abrasive wheel.
CUTTING
• To cut, grip handle of housing, squeeze and main-
tain trigger. Let saw come to full speed, then press
down on handle to lower the abrasive wheel onto
workpiece.
• Do not force the tool during operation. Apply steady
but not heavy hand pressure. Heavy hand pressure
will reduce the life of the abrasive wheel.
• If the saw chatters or slows, reduce pressure. If
abrasivewheel stalls, release trigger to avoid burn-
ingout the motor.
• Note: When cutting large solid pieces (e.g. 2" dia.
round), do not overload motor-- use light to
moderate hand pressure.
• If feed pressure istoo low,the abrasive wheel will
not dig into material properly.
• Do not use to cut wood or plastic materials with
abrasive wheel. Do not use to cut flammable
materials.
• Do not use cuttingfluids. This tool uses the high
RPM of its abrasive wheel to cut through metal
workpieces.
• Do not block or cover vent slots in housing; free air
flow is needed to keep the motor cool.
4