


For the most pmeasurefrom your Scrol! Saw/
Sander follow these instructions carefully:
The Craftsman Scroll Saw is a multi-purpose workshop,
By connecting different attachments to the power take-
off, the unit is converted from the basic scroll saw to a
grinder, sander, buffing wheel, brush wheel, and a flex-
ible shaft machine. Then you are able not only to saw,
but dri!l, grind, polish, rout, sharpen, sand, buff, carve,
engrave and perform many other hobby, home or shop
operations Use with 2471 accessory pack.
DO NOT OPERATE MACHINE WITHOUT ATTACHING
TABLE, CAUTION: DISCONNECT PLUG FROM OUTLET,,
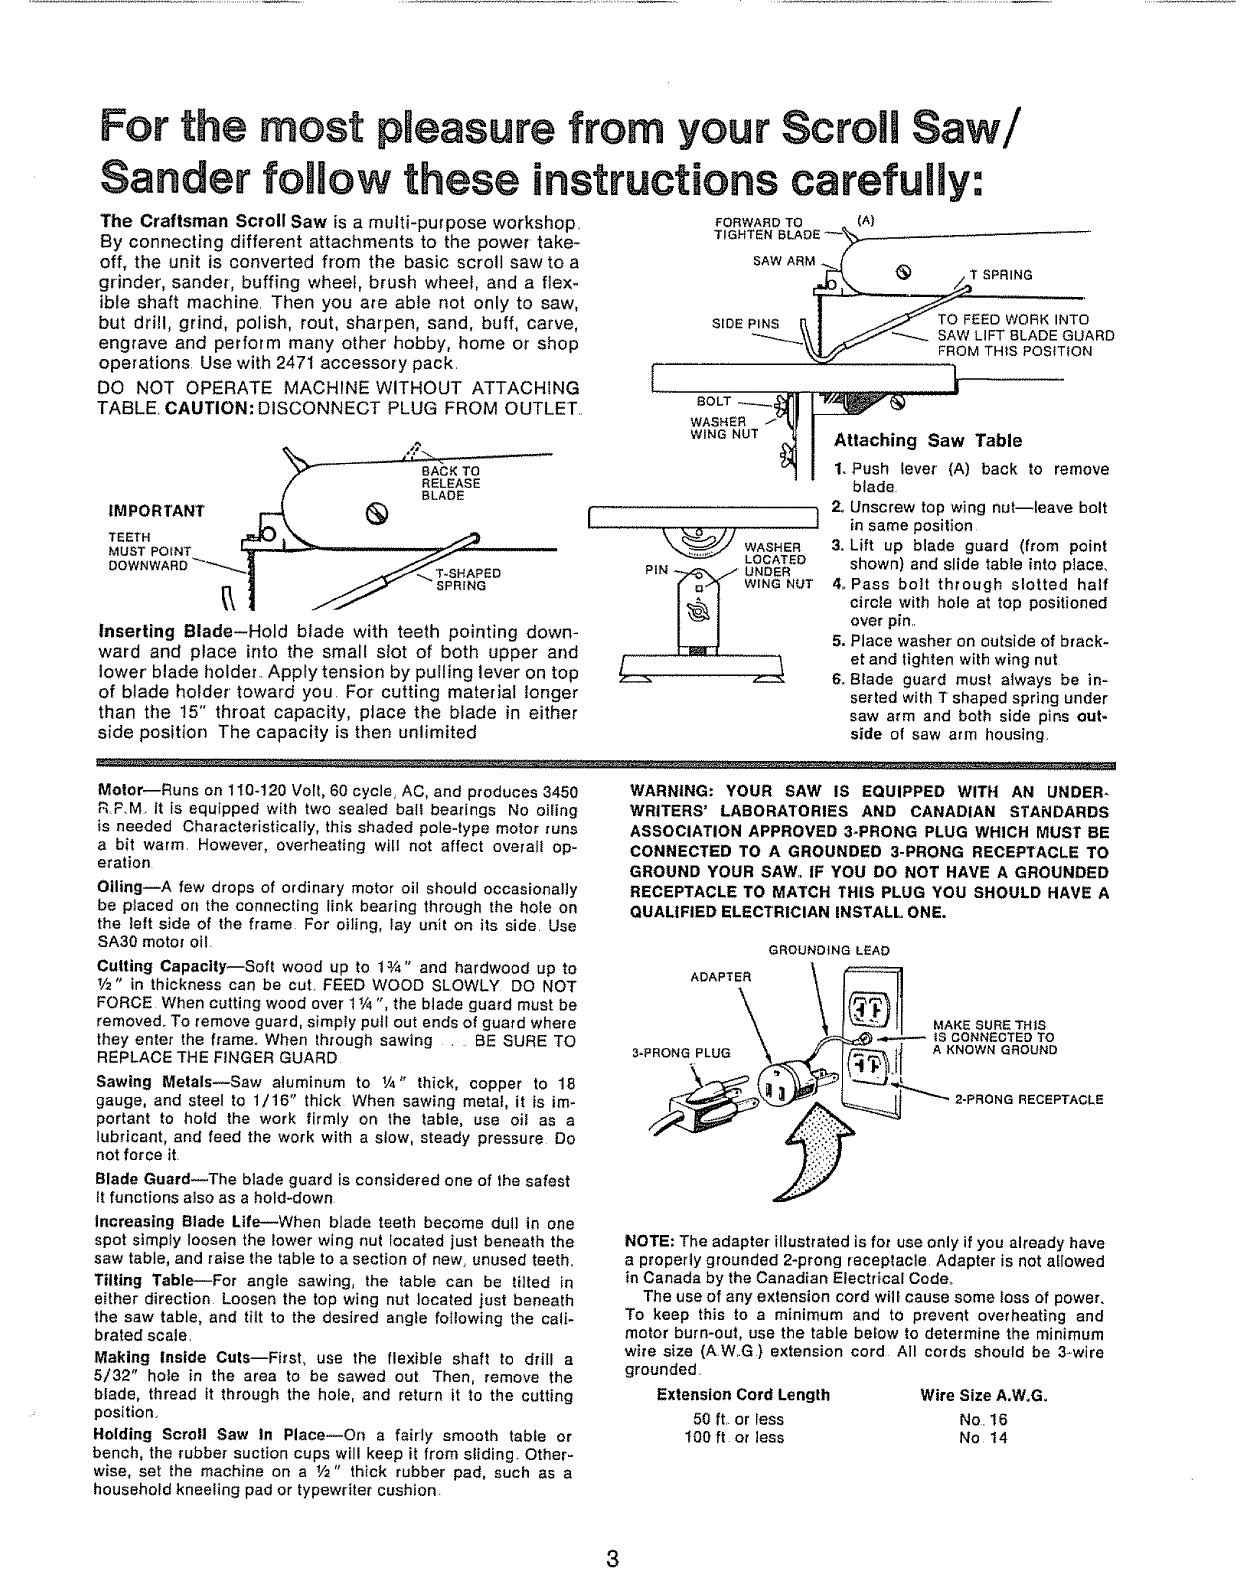
inserting Blade--Hold blade with teeth pointing down-
ward and place into the small slot of both upper and
lower blade holder._ Apply tension by pulling lever on top
of blade holder toward you. For cutting material longer
than the 15" throat capacity, place the blade in either
side position The capacity is then unlimited
[
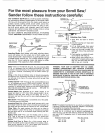
FORWARD TO (A)
TIGHTEN BLADE _
SAW ARM ,.._.tt _ T SPRING
...... ....
_\\ | //_.. SAW LIFT BLADE GUARD
...........................................................FRLOMTHlS POStT_ON
|
WING NUT _ I Attaching Saw Table
I 1. Push lever (A) back to remove
blade.
] 2, Unscrew top wing nut--leave bolt
in same position
3. Lift up blade guard (from point
shown) and slide table into place,
4,,Pass bolt through slotted half
circle with hole at top positioned
over pin..
5. Place washer on outside of brack-
et and tighten with wing nut
& Blade guard must always be in-
serted with T shaped spring under
saw arm and both side pins out-
side of saw arm housing,
WASHER
LOCATED
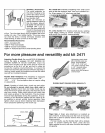
Motor--Runs on 110-120 Volt, 60 cycle, AC, and produces 3450
R.P.M. It is equipped with two sealed bali bearings No oiling
is needed Characteristically, this shaded poleqype motor runs
a bit warm. However, overheating wilt not affect overall op-
eration
Oiling_A few drops of ordinary motor oil should occasionally
be placed on the connecting link bearing through the hole on
the _eft side of the frame For oiling, tay unit on its side. Use
SA30 motor oil
Cutting Capacity_Soft wood up to 1%" and hardwood up to
_/2" in thickness can be cut. FEED WOOD SLOWLY DO NOT
FORCE When cutting wood over 1V4", the blade guard must be
removed,. To remove guard, simply putl out ends of guard where
they enter the frame. When through sawing .... BE SURE TO
REPLACE THE FINGER GUARD
Sawing Metals_Saw aluminum to V4" thick, copper to 18
gauge, and steel to 1/16" thick When sawing metal, it is im-
portant to hold the work firmly on the table, use oil as a
lubricant, and feed the work with a stow, steady pressure Do
not force it.
Blade Guard_The blade guard is considered one of the safest
It functions also as a hold-down
Increasing Blade Life--When blade teeth become dull in one
spot simpty loosen the lower wing nut located just beneath the
saw table, and raise the table to a section of new, unused teeth..
Tilting Table--For angle sawing, the table can be tilted in
either direction Loosen the top wing nut located just beneath
the saw table, and tilt to the desired angle following the cali-
brated scale.
Making Inside Cuts--FirsL use the flexible shaft to drill a
5/32" hole in the area to be sawed out Then, remove the
blade, thread it through the hole, and return it to the cutting
position.
Holding Scroll Saw In Place_On a fairly smooth table or
bench, the rubber suction cups will keep it from sliding. Other-
wise, set the machine on a _/2" thick rubber pad, such as a
household kneefing pad or typewriter cushion.
WARNING: YOUR SAW IS EQUIPPED WITH AN UNDER-
WRITERS' LABORATORIES AND CANADIAN STANDARDS
ASSOCIATION APPROVED 3-PRONG PLUG WHICH MUST BE
CONNECTED TO A GROUNDED 3-PRONG RECEPTACLE TO
GROUND YOUR SAW,, IF YOU DO NOT HAVE A GROUNDED
RECEPTACLE TO MATCH THIS PLUG YOU SHOULD HAVE A
QUALIFIED ELECTRICIAN INSTALL ONE.
GROUNDING LEAD
ADAPTER
3-PRONG PLUG
MAKE SURE TH_S
tS CONNECTED TO
A KNOWN GROUND
2-PRONG RECEPTACLE
NOTE: The adapter illustrated is for use only if you already have
a properly grounded 2-prong receptacle Adapter is not allowed
in Canada by the Canadian Electrical Code,.
The use of any extension cord wilF cause some loss of power.
To keep this to a minimum and to prevent overheating and
motor burn-out, use the table beEow to determine the minimum
wire size (AW..G.} extension cord All cords should be 3-wire
grounded.
Extension Cord Length Wire Size A.W,G_
50 ftr= or Iess No. 16
t00 ft or tess No 14
3