


Crestron TPMC-4XG-BTP Battery for TPMC-4XG & TPMC-4XG-B
Setup
Removal
NOTE: To prevent damage to multi-pin connector and wiring, use care
when handling the TPMC-4XG-BTP.
Perform the following procedure to remove the existing
TPMC-4XG-BTP from a TPMC-4XG or TPMC-4XG-B touchpanel:
1. Place the touchpanel screen side down on a clean, soft surface.
2. Remove the battery compartment cover on the rear of the
touchpanel.
3. Using the flat end of a small slot head screwdriver, gently pry the
multi-pin connector off the corresponding connector in the battery
compartment of the touchpanel.
4. With the multi-pin connector detached from the touchpanel, lift the
TPMC-4XG-BTP out of the battery compartment.
Installation
After completing removal of the old TPS-4XG-BTP from the touchpanel
(refer to “Removal” above), perform the following procedure to install
the TPMC-4XG-BTP in a TPMC-4XG or TPMC-4XG-B touchpanel:
1. Place the TPMC-4XG-BTP in the battery compartment oriented so
the multi-pin connector is on the top.
2. Carefully connect the multi-pin connector of the TPMC-4XG-BTP
with the corresponding connector inside the battery compartment.
The pin side of the connector should be facing downward (toward
the front of the touchpanel).
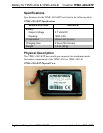
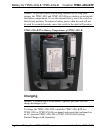
NOTE: When installing the battery in the touchpanel, ensure the
connecting wires are not under the battery. Refer to the photo on the
following page for proper wire routing.
3. Re-attach the battery compartment cover.
Installation Guide – DOC. 6657B Internal Battery Pack: TPMC-4XG-BTP • 3