


Dayton Operating Instructions and Parts Manual
7
Model 3VG79
Version B - For Reduction G016.J
®
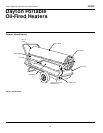
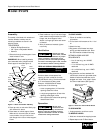
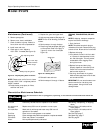
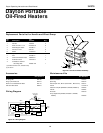
Figure 10 - Adjusting Pump Pressure
Pressure
Gauge
Side
Cover
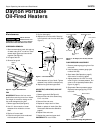
Bushing, Lower Fuel Line,
and Fuel Filter
Figure 11 - Fuel Filter Removal
Fuel Valve
Fitting
High Voltage.
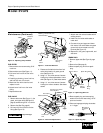
FUEL VALVE
1. Remove side cover (See Figure 11), fan
guard, and upper shell (See Figure 6,
page 6) screws using 5/16" nut-driver.
2. Remove fan (See Fan, page 6).
3. Pull lower fuel line off the fuel valve
fitting (See Figure 12).
4. Disconnect 3 electrical wires from fuel
valve. Note location of green ground
wire (See Figure 12).
5. Using 1/4" nut driver remove 2 screws
holding fuel valve and bracket to lower
shell (See Figure 12). Save these screws.
6. Using 1/4" nut driver remove 2 screws
holding fuel valve to bracket. Save these
screws
7. Attach new fuel valve to bracket with 2
existing screws.
8. Install new fuel valve and bracket on
lower shell.
9. Connect wiring and upper and lower
fuel lines to fuel valve. Make sure green
ground wire is connected to correct
terminal (See Figure 12).
10. Replace fan, fan guard, upper shell, and
side cover.
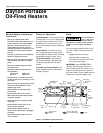
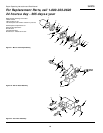
Lower Fuel
Line
Electrical Wires
Green
Ground
Wire
Fuel Valve
Terminal for Green
Ground Wire
Valve
Fittings
Bracket
Screw
Screw
Figure 12 - Fuel Valve Replacement
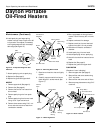
SPARK PLUG
1. Remove upper shell (See Figure 6, page
6).
2. Remove fan (See page 6).
3. Remove spark plug wire from spark
plug.
Spark Plug Wire
Spark
Plug
Burner Head
4. Remove spark plug and wave spring
washer from burner head using 13/16"
open-end wrench.
5. Clean and regap spark plug electrodes
to .110 gap.
Figure 13 - Spark Plug Removal
Figure 14 - Spark Plug Gap
FUEL FILTER
1. Remove side cover screws using 5/16"
nut-driver.
2. Remove side cover (See Figure 11).
3. Pull lower fuel line off the fuel valve
fitting.
4. Carefully pry bushing, lower fuel line,
and fuel filter out of fuel tank.
5. Wash fuel filter with clean fuel and
replace in tank.
6. Attach lower fuel line to fuel valve
fitting.
7. Replace side cover.
Gap
Bend Here
to Adjust
Gap
Maintenance (Continued)
Wave
Spring
Washer