


12
MG6-OLVERT-3B Rev. 2 6/27/00
1. Before attaching an air hose or accessory, make sure the
shut-off valve is in the closed position. On units equipped
with a pressure switch lever make sure the switch is in the
OFF position.
Compressed air from the outfit may contain water
condensation and oil mist. Do not spray unfiltered air
at an item that could be damaged by moisture. Some
air operated tools or devices may require filtered air.
Read instructions for air tool or device.
2. Attach regulator, hose and accessory. On models without
an air pressure regulator, one must be installed before using
accessories rated at less than 175 psig.
TOO MUCH AIR PRESSURE CAUSES A
HAZARDOUS RISK OF BURSTING. CHECK THE
MANUFACTURER'S MAXIMUM PRESSURE
RATING FOR AIR TOOLS AND ACCESSORIES.
THE REGULATOR OUTLET PRESSURE MUST
NEVER EXCEED THE MAXIMUM PRESSURE
RATING.
3. Turn the air compressor ON and allow air tank pressure to
build. On units equipped with a pressure switch lever, place
the switch in the ON-AUTO position. The motor will stop
when air tank pressure reaches "cut-out pressure".
4. Open the shut-off valve.
5. If an air pressure regulator is in use, open the regulator by
turning it clockwise. Adjust the regulator to the correct
pressure setting. Your outfit is ready for use.
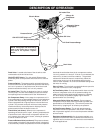
OPERATING PROCEDURES
BREAK-IN PROCEDURES
Break-In Procedures
Serious damage may result if the following break-in
instructions are not closely followed.
The Break-In Procedure is required when:
A. New air compressor is put into service.
B. Check valve is replaced
C. New pump is installed on air tank.
1. Recheck air compressor wiring. Make sure wires are
secure at all terminal connections. Free all contacts of
loose wire cuttings, etc.
2. Position the fuse disconnect or circuit breaker to the ON
position and, if equipped, turn the ON/AUTO-OFF
switch on the pressure switch to the ON position.
3. Open the shut-off valve fully to permit air to escape and
prevent air pressure build-up in the air tank during the
break-in period.
4. Run the air compressor for 30 minutes. Make sure the
shut-off valve is open and there is no air tank pressure
build-up.
5. Check all air line fittings and connections/piping for air
leaks by applying a soap solution. Correct as necessary.
Even minor leaks can cause this air compressor to
overwork, resulting in premature breakdown or
inadequate performance.
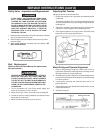
6. Check for excessive vibration and noise. Adjust air
compressor belt guard as necessary to eliminate chatter.
Readjust or shim the air compressor feet, if necessary,
for proper level.
7. Close the shut-off valve and let air compressor pump up
to "cut-out pressure". Turn the air compressor off and
check oil level. Add oil if necessary. Connect air hose to
air outlet adapter.
Your air compressor is now ready for use.
When You Are Finished:
6. Turn the air compressor unit off.
7. Turn the regulator counterclockwise and set the outlet
pressure to zero.
8. Remove the air tool or accessory.
9. Open the regulator and allow the air to slowly bleed from the
air tank. Close the regulator when air tank pressure is
approximately 20 psi.
10. Open the drain valve underneath the air tank and drain water
from air tank.
DRAIN AIR TANK DAILY. WATER WILL
CONDENSE IN THE AIR TANK. IF NOT DRAINED,
THE WATER WILL CORRODE AND WEAKEN THE
AIR TANK, CAUSING A RISK OF AIR TANK
RUPTURE. THE AIR TANK MUST BE DRAINED
PROPERLY.
11. After the water has been drained, close the drain valve.
- if the air compressor is under continuous use
- drain at least once each day.
- if the air compressor is only used occasionally
- drain after each use.
Operate the unit to 15-20 psig and open the drain cock.
Collect the water in a suitable container. Continue operating
unit until all moisture is removed from the air tank. Close the
drain cock tightly.
Note
If drain cock valve is clogged, release air pressure
in air tank. The drain cock valve can then be
removed, cleaned and reinstalled.