


5
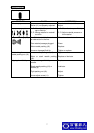
Chart 2 Air Cap, Fluid Tip and Needle Combination
Air Cap Lapped Set (Tip & Needle)
Part Number
Code No.
Part Number Size (mm)
Material
Supply
JGA-4046-DFX 1.1
JGA-4046-DFW 1.6
AV-1239-805 802447
JGA-4046-GD 0.7
Pressure
JGA-4046-DFX 1.1
JGA-4046-DFW 1.6
AV-1239-807 802449
JGA-4046-GD 0.7
Pressure
INSTALLATION/OPERATION
NOTE: The air supplied to spray gun must be cleaned air which any water, oil and solid material
removed. To set up the Mist Separator and Air Transformer near the gun is recommended.
As LVMP gun consumes less air, it is not necessary to use thicker hose compare to HVLP gun.
CAUTION: Adjust Needle Packing (18) before start using new gun. Tighten the Packing Nut (19)
gradually and then to adjust the needle moving smoothly, untighten a little where the Needle (9) is not
well pulled back
The Air Cap Pressure is set at 0.2MPa when Gun Inlet Pressure is 0.25MPa. It is recommended
to check the Air Cap Pressure just in case with the Air Cap Test Kit which is available separately.
The recommended spray distance is 150 200mm. If the spray distance is too far, good result does
not appear. Also, in order to get uniform finishing, the spray gun should be hold vertically toward the
painting surface.
To adjust the fluid delivery, keep the needle full open, not tightening the Adjusting Screw, so that the
delivery can be adjusted at the material supply line. It leaves the abrasion of the Fluid Tip (4) and the
Needle (9) the minimum.
The paint should be filtered through 60 90 mesh filter before use.
MAINTENANCE
Daily lubrication and cleaning is necessary to maintain the best condition of the gun.
NOTE: Clean the spray gun after used with clean solvent and empty the inside of the hose.
To clean the fluid passage, after removing extra paint, through the appropriate solvent and flush down
the residual paint. When blowing the paint inside the hose and the gun back to pressure tank by
pressuring, follow the following procedure:
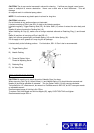
Release the pressure in the tank and loosen the lid a little, then make one rotation to loosen the
Retaining Ring (1), which presses the gun cap. Press the point of the gun with cloth and pull the
Trigger (20). The atomizing air then flows back to the fluid hose and the paint in the hose is flushed
back to the tank.
CAUTION: To clean the gun body, wipe exterior with solvent dampened cloth. Do not submerge the
gun body in solvent as any solids may get into the air passage and cause troubles.