


6
does not function when the 3 jaw keyless
chuck is used.
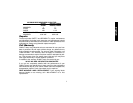
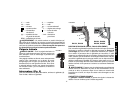
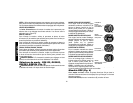
Both the SDS and 3 jaw keyless chuck can
be easily removed by turning the collar (E)
into the unlocked position (F) to release the
chuck (Fig. 4).
The SDS and 3 jaw keyless chuck can be
easily attached by inserting the chuck into
the spindle of the tool and turning the collar
to the locked position (G). The chuck will
click when properly installed.
DRILLING IN METAL
(D25103, D25203, D25303, D25304)
An SDS to round shank adaptor chuck is required. Ensure that tool is
in drill-only mode. (D25101, D25201 has no drill-only mode). Start
drilling with slow speed and increase to full power while applying firm
pressure on the tool. A smooth even flow of metal chips indicates the
proper drilling rate. Use a cutting lubricant when drilling metals. The
exceptions are cast iron and brass which should be drilled dry. The
cutting lubricants that work best are sulphurized cutting oil or lard oil;
bacon-grease will also serve the purpose.
NOTE: Large (5/16" to 1/2") holes in steel can be made easier if a pilot
hole (5/32" to 3/16") is drilled first.
DRILLING IN WOOD
(D25103, D25203, D25303, D25304)
An SDS to round shank adaptor chuck is required. Ensure that tool is
in drill-only mode. (D25101, D25201 have no drill-only mode). Start
drilling with slow speed and increase to full power while applying firm
pressure on the tool. Holes in wood can be made with the same twist
drills used for metal. These bits may overheat unless pulled out fre-
quently to clear chips from the flutes. For larger holes, use spade bits,
power auger bits, or hole saws. Work that is apt to splinter should be
backed up with a block of wood.
DRILLING IN MASONRY
When drilling in masonry, use SDS carbide tipped bits rated for per-
cussion drilling and be certain that the bit is sharp. Use a constant and
firm force on the tool to drill most effectively. A smooth, even flow of
dust indicates the proper drilling rate.
Depth Rod
TO ADJUST THE DEPTH ROD
1. Push in and hold the button on the side handle.
2. Move the rod so the distance between the end of the rod and the
end of the bit equals the desired drilling depth.
3. Release the button to lock rod into position.
When drilling with the depth rod, stop when end of rod reaches
surface of material.
Maintenance
CLEANING & LUBRICATION
Use only mild soap and damp cloth to clean the tool. Never let any liq-
uid get inside the tool; never immerse any part of the tool into a liquid.
Self-lubricating bearings are used in the tool and periodic relubrication
is not required. In the unlikely event that service is ever needed, take
your tool to an authorized service location.
Accessories
CAUTION: When handling accessories after use, wear work
gloves. Accessories may be hot and may burn skin.
Recommended accessories for use with your tool are available at
extra cost from your distributor or local service center.
CAUTION: The use of any non-recommended accessory may be
hazardous.
English
FIGURE 4
D
G
F
E