Inspect your saw periodically for leakage. If you notice any leaks promptly return your saw to a
service center for inspection and relubrication.
Brushes
CAUTION: Turn off and unplug the tool before making any adjustments or
removing/installing attachments or accessories.
Inspect carbon brushes regularly by unplugging tool, removing the Brush Inspection Cover
and withdrawing the brush assembly. Keep brushes clean and sliding freely in their guides.
Always replace a used brush in the same orientation in the holder as it was prior to removal.
Carbon brushes have varying symbols stamped into their sides, and if either brush is worn
down to the line closest to the spring, they must be replaced. Use only identical D
EWALT
brushes. New brush assemblies are available at your local service center. The tool should be
allowed to “run in” (run at no load without a blade) for 10 minutes before use to seat new
brushes.
While “running in” DO NOT TIE, TAPE, OR OTHERWISE LOCK THE TRIGGER SWITCH ON.
HOLD BY HAND ONLY.
SHOE ADJUSTMENT
CAUTION: Turn off and unplug the tool before making any adjustments or
removing/installing attachments or accessories.
Your shoe has been factory set to assure that the blade is perpendicular to the shoe. If after
extended use, you need to re-align the blade as follows:
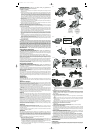
ADJUSTING FOR 90 DEGREE CUTS (FIG. 7, 8)
1. Return the saw to 0 degrees bevel.
2. Place the saw on its side, and retract the lower guard.
3. Loosen the Bevel Adjustment Lever (M). Place a square against the blade and the shoe.
4. Using an Allen wrench, turn the set screw on the underside of the shoe (K) until the blade
and the shoe are both in flush contact with the square. Retighten the Bevel Adjust Lever.
ADJUSTING DEPTH ADJUSTMENT AND BEVEL ADJUSTMENT LEVERS.
It may be desirable to adjust the the depth adjustment lever or the bevel adjustment lever. (They
may loosen in time and hit the shoe before tightening). To tighten either, follow the steps below.
CAUTION: Turn off and unplug the tool before making any adjustments or
removing/installing attachments or accessories.
1. Using a small screwdriver, pry the lock ring off, see Figure 9.
2. Remove the lever and rotate it in the desired direction about 1/8 of a revolution.
3. Reinstall the lock ring with the concave side against the lever to hold it in place.
Blades
A dull blade will cause slow, inefficient cutting, overload on the saw motor, excessive splintering
and increase the possibility of kickback. Change blades when it is no longer easy to push the
saw through the cut, when the motor is straining, or when excessive heat is built up in the blade.
It is a good practice to keep extra blades on hand so that sharp blades are available for immediate
use. Dull blades can be sharpened in most areas; see SAWS-SHARPENING in the yellow
pages.
Hardened gum on the blade can be removed with trichlorethylene (nail polish remover),
kerosene, turpentine, or oven cleaner. Anti-stick coated blades can be used in applications
where excessive build-up is encountered, such as pressure treated and green lumber.
VISUALLY EXAMINE CARBIDE BLADES BEFORE USE. REPLACE IF DAMAGED.
COMBINATION FRAMING- All purpose fast rip and cross cuts.
PRESSURE TREATED/WET LUMBER- Coated - Resistant to build-up
EXTREME DURABILITY - Maximum impact resistance for longer life.
FINISHING - More teeth for finer finish cuts.
FAST CUT FRAMING - Fastest blade for rips and cross cuts
D
EWALT also offers a full line of steel blades for specialty jobs such as plywood, non-ferrous
metal, planing, and iron/steel.
NOTE: All D
EWALT blades offer a diamond knockout for use on this saw.
Accessories
WATER FEED ATTACHMENTS ARE NOT RECOMMENDED FOR THIS SAW.
Recommended accessories for use with your tool are available at extra cost from your local service
center.
CAUTION: The use of any non-recommended accessory may be hazardous.
If you need any assistance in locating any accessory, please contact D
EWALT Industrial Tool
Co., 701 East Joppa Road, Baltimore, MD 21286 or call 1-800-732-4441.
Repairs


