


Page 9
Important Charging Notes
1. The battery pack accepts only about 80% of its
maximum capacity with its first few charge cycles.
However, after the first few charge cycles, the battery
will charge to full capacity.
2. The charger was designed to fast charge the bat-
tery only when the battery temperature is between
40˚F (4˚C) and 105˚F (41˚C).
3. A substantial drop in operating time per charge
may mean that the battery pack is nearing the end of
its life and should be replaced.
4. If you anticipate long periods (i.e. a month or more)
of non-use of your tool, it is best to run your tool down
until it is fully discharged before storing your battery
pack. After a long period of storage, the capacity at first
recharge will be lower. Normal capacity will be restored
in two or three charge/discharge cycles. Remember to
unplug charger during storage period.
5. If battery does not charge properly:
a. Check for voltage at outlet by plugging in
some other electrical device.
b. Check to see if outlet is connected to a light
switch which turns power “off” when lights are turned
off.
c. Check battery pack terminals for dirt. Clean
with cotton swab and alcohol if necessary.
d. If you still do not get proper charging, take or
send tool, battery pack and charger to your Dremel
Service Center.
Note: Use of chargers or battery packs not sold by
Dremel may void the warranty.
Read the next sections carefully. They will help you use
your Cordless Rotary Tool correctly and help you select
the correct accessory for your job.
Charging the Tool
The Cordless Rotary Tool is not fully charged. The tool
is equipped with a removable battery pack. Be sure to
charge pack prior to initial use. For best results on first
charge, charge pack overnight.
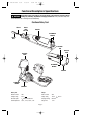
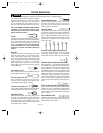
To charge the battery pack
1. Put the switch in the “OFF” position.
2. Squeeze release tabs on both sides of battery pack,
and remove pack from back of tool as shown on page 7.
3. Align marks on battery pack with marks on charger,
insert battery pack into charger as shown.
4. Plug charger into the power source. The green L.E.D.
light indicates connection has been made and the
battery pack is charging. Under normal usage the bat-
tery pack requires 3 hours charging time to reach full
capacity.
5. When charging is completed, remove pack from
charger.
6. Align marks on battery pack with marks on the hous-
ing of tool as shown. Squeeze release tabs, insert bat-
tery pack into back of tool, and release pressure on tabs
so it locks in place.
don’t apply pressure to the tool, but simply hold and
guide it. In the low speed tools, you not only guide the
tool, but also apply pressure to it, as you do, for example,
when drilling a hole.
It is this high speed, along with its compact size and
wide variety of special accessories and attachments that
makes your Cordless Rotary Tool different from other
power tools. The speed enables it to do jobs low speed
tools cannot do, such as cutting hardened steel, en-
graving glass, etc.
Getting the most out of your Cordless Rotary Tool is a
matter of learning how to let this speed work for you.
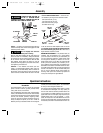
Using the Cordless Rotary Tool
The first step in learning to use the Cordless Rotary Tool
is to get the “feel” of it. Hold it in your hand and feel its
weight and balance. Feel the taper of the housing. This
taper permits the tool to be grasped much like a pen or
pencil.
When you turn on the tool for the first time, hold it away
from your face. Accessories can be damaged during
handling, and can fly apart as they come up to speed.
This is not common, but it does happen.
Practice on scrap materials first to see how the Cordless
Rotary Tool cuts. Keep in mind that the work is done by
the speed of the tool and by the accessory in the collet.
You should not lean on or push the tool into the work.
Instead, lower the spinning accessory lightly to the
work and allow it to touch the point at which you want
cutting (or sanding or etching, etc.) to begin. Con-
centrate on guiding the tool over the work using very lit-
tle pressure from your hand. Allow the accessory to do
the work.
Usually, it is best to make a series of passes with the
tool rather than attempt to do all the work in one pass.
To make a cut, for example, pass the tool back and forth
over the work, much as you would a small paint brush.
DM 2610913513 6/01 6/8/01 8:44 PM Page 9