


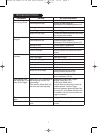

Type of paint Cleaning
Water based paint Clean with water
Oiled based paint Clean with white spirit
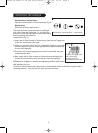
Removing the Fluid Tip and Fluid Needle assembly (for cleaning or switching to a smaller/larger
diameter).
CLEANING
SPRAY GUN
6
Flush out the residue paint from the spray gun, as follows:
●
Remove the paint container (25) from the spray gun.
●
Pour any residual paint into its original container for future use.
●
Use a cloth soaked in thinners to wipe out excess paint from the container, the underside of the
lid (22) & the gasket (23).
●
Pour a small quantity of clean thinners into the container, re-fit the container to the spray gun
and shake the gun lightly.
●
Now spray all of the thinners through the gun.
●
Repeat this, each time using clean thinners, until there is no trace of paint in the thinners
being sprayed.
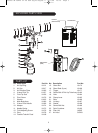
To thoroughly clean the remainder of the spray gun, remove all working parts as per the
exploded spare parts drawing on p.3 as follows.
●
Loosen and remove Air Cap Ring (1),Air Cap (2) and Air Distributor Plate & Spring (3).
●
Now unscrew the Adjusting Screw (12) and pull out the Needle (9) and Needle Spring (11).
●
Use the supplied spanner, to remove the Fluid Tip (4) and Fluid Tip Seal (5).
All of the components above can be immersed in thinners and cleaned using the cleaning kit
supplied with this product. After cleaning your spray gun and before fitting the needle, dip the tip
into some vaseline which will lubricate the gland washers as the needle is inserted.
• NEVER DISPOSE OF PAINTS OR SOLVENTS DOWN THE DRAIN. ALWAYS USE
YOUR LOCAL WASTE COLLECTION SITE.
HV6900 UK NO226 01-09 New-Style:Layout 2 15/1/09 10:15 Page 6