


12
ENGLISH
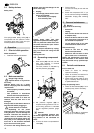
3.3 Safety devices
Safety valve
The spring-loaded safety valve (18) is
incorporated into the pressure switch.
The safety valve opens if the max. per-
missible pressure is exceeded.
4.1 Prior to initial operation
Wheel installation
1. Install the wheels as illustrated.
4.2 Mains connection
B
Danger! High voltage
Operate device in dry environ-
ment only.
Operate device only on a power
source complying with the following
requirements:
− outlets properly installed, earthed
and tested;
− fuse protection in accordance
with the technical specifications.
Position power cable so it does not
interfere with the work and is not
damaged.
Always check to see that the device is
switched OFF before plugging in.
B
Check direction of rotation!
Depending on the phase
sequence, the motor could turn in the
wrong direction. This can damage the
machine. Therefore the direction of
rotation must be checked after any
reconnection to the power mains: the
belt pulley of the compressor pump
must turn in the direction indicated
by the arrow on the belt guard.
If it turns in the wrong direction, two
phases must be interchanged in the
power cable plug:
1. Unplug.
2. Interchange phases with a screw-
driver as illustrated:
− Push switch (19) in slightly.
− Turn switch by 180°.
3. Plug power cable in again.
Protect power cable from heat,
aggressive liquids and sharp edges.
Use only extension cables with suffi-
cient lead cross section (see "Techni-
cal Specifications").
Do not stop the machine by unplug-
ging, but switch OFF using the ON/
OFF switch.
Unplug after use.
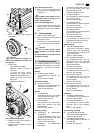
4.3 Generating compressed
air
1. Start device (22) and wait until the
max. tank pressure is reached
(compressor shuts off).
The tank pressure is indicated by
the tank pressure gauge (23).
2. Set pressure regulator (20) to
required working pressure. The cur-
rent working pressure is indicated
by the regulated pressure gauge
(21).
A
Caution!
The regulated pressure may
not be set higher than the max. work-
ing pressure of the connected air
tools!
3. Connect air hose to compressed air
outlet (24).
4. Connect air tool.
You are now ready to work with the
air tool.
5. Switch the compressor OFF, if you
do not continue working immediately
afterwards. Unplug after switching
OFF.
A
Danger!
Prior to all servicing:
− Switch Off.
− Unplug.
− Wait until the device has come to
a complete stop.
− Ensure the device and all air tools
and accessories connected to it
are relieved from pressure.
− Let the device and all air tools
and accessories used cool off.
After all servicing:
− Check to see that all safety
devices are operational.
− Make sure that no tools or other
parts remain on or in the device.
Repair and maintenance work other
than described in this section must
only be carried out by qualified spe-
cialists.
5.1 Periodic maintenance
Prior to each use
• Check air hoses for damage,
replace if necessary.
• Check all screwed connections for
tightness, tighten if necessary.
• Check power supply cable for dam-
age, if necessary have replaced by
a qualified electrician.
Every 50 operating hours
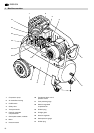
• Check air filter element (25) of com-
pressor pump, clean if necessary.
• Check oil level (26) of compressor
pump, top up if necessary (27).
4. Operation
AUTO
O OFF
18
19
AUTO
O OFF
22
23
20
21
24
5. Care and maintenance
25