


6
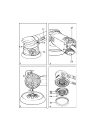
Speed adjustment
You can regulate the speed steplessly between
2000 and 5600 rpm using the adjusting wheel
(2.1). This lets you optimize the sanding speed
to suit the material.
Constant speed
The pre-selected speed remains constant
whether the tool is in operation or in neutral
position.
Temperature control
To prevent overheating, the safety electronics
switch the tool off when it reaches a critical
motor temperature. Let the tool cool down for
approx. 3-5 minutes before using it again. The
tool requires less time to cool down if it is
running, i.e. in neutral position.
Two-hand operation
The optional hand grip (1.2) can be attached
to the tool on the right or left-hand side of the
gearbox cover.
Dust extraction
Always connect the tool to a dust
extractor.
You can connect a Festool extractor with an
extractor hose diameter of 27 mm to the dust
extraction port (2.2).
Tool settings
Always remove the power plug
from the socket before carrying out any work
on the power tool.
Sanding motion
You can use the switch (1.3) to set two diffe-
rent sanding motions.
Change from one motion to the other by
switching the rocker lever (1.3) away from the
gearbox by 90°, turning it 180° in a clockwise
or anticlockwise direction and then locking it,
while inserting the locking nose on the lever
into the slot (1.4) on the gearbox. The
resistance encountered when rotating the lever
through 180° can be eliminated by rotating the
sanding pad a little.
Rotex rotary motion (coarse sanding,
polishing)
The Rotex rotary motion is a combination
of rotary and eccentric motions. This
motion is recommended for sanding with
aggressive material removal (coarse
sanding) and polishing.
Slide the switch into the position (3.2).
Eccentric motion (fine sanding)
This motion is recommended for sanding
with low material removal for a scratch-
free finish (fine sanding).
Slide the switch into the position (3.1).
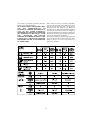
Choice and installation of sanding
pads
Choice of sanding pad
The tool can be fitted with three sanding pads
of different hardnesses depending on the
surface to be sanded.
Hard: Coarse sanding on surfaces, sanding at
edges.
Soft: Universal use for coarse and fine sanding
for flat and curved surfaces.
Super-soft: Fine sanding on formed parts,
curves, radii. Do not use on edges!
Installation
The sanding pad must be located positively with
the alignment spigot on the tool (3.3). Check
to ensure that the pad is positioned correctly
before screwing it firmly into place. This will
prevent it from coming loose when the tool is
in operation.
Attaching the abrasive
Stickfix is a hook-and-loop fastening
system. Stickfix sanding pads allow the
use of self-adhesive hook-and-loop
abrasives such as Stickfix sandpapers
and sanding cloths.
Simply press the abrasive onto the sanding pad
and pull it off again after use.
Use only abrasives with an
undamaged Stickfix hook-and-loop coating.
Before use, check that the coating has not been
damaged by improper use (such as over-
heating).
Securing polishing attachments
To prevent damage, use PoliStick polishing
attachments (sponges, felt, lambswool
bonnets) only with the special polishing pad
fitted on the tool instead of a sanding pad. Like
StickFix abrasives, the PoliStick polishing
attachments are simply pressed onto the
polishing pad and pulled off after use.
Pad brake
The tool has a pad brake for eccentric sanding
which prevents the sanding pad from
accelerating in an uncontrollable manner when
the machine is raised from the workpiece.