


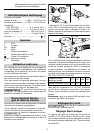

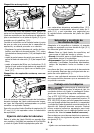

5
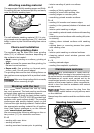
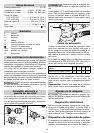
Attaching sanding material
The appropriate Stickfi x sanding paper and Stick-
fi x sanding felt can be fastened quickly and easily
onto the Stickfi x sanding base.
5.1
5.2
The self-adhesive sanding material (5.2) is sim-
ply pressed onto the sanding base (5.1) and held
safely in place by the Stickfi x sanding base velcro
surface.
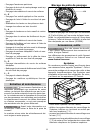
Choice and installation
of the grinding disks
The appliance can be fi tted with three grinding
disks (5.1) of different hardness depending on
the surface to be treated.
• Hard: coarse grinding on surfaces, grinding at
edges.
• Soft: universal for coarse and fi ne grinding, for
fl at and curved surfaces.
• Super-soft: fi ne grinding on formed parts,
curves, radii. Do not use on edges!
The grinding disks and the tool-holding fi xture on
the appliance are equipped with a positive holder
(6.1).
Make sure the grinding disk is correctly
positioned before screwing it tight.
Working with the tool
Never overload the tool by using
too much pressure! The best sanding results are
achieved when applying moderate pressure.
The ETS 150/3 EQ gives the best surface quality
and low abrasion. The ETS 150/5 EQ provides high
abrasion with good surface quality. The sanding
performance and quality depend mainly on the
choice of the right sanding material. Festool offers
the appropriate sanding material for all applica-
tions (see Festool catalogue or on the Internet
under www.festool-usa.com).
We recommend the following settings on the ro-
tary control (2.3) for electronic machines:
5 - 6
- sanding with max. drive
- sanding old paint
- sanding wood and veneer prior to painting
- interim sanding of paint on surfaces
4 - 5
- sanding of thinly applied primer
- sanding of wood with sanding vlies
- sanding edges on wooden parts
- smoothing primed wooden surfaces.
3 - 4
- sanding full wooden and veneer edges
- sanding in the grooves/rebates of windows and
doors
- interim paint sanding on edges
- pre-sanding natural wood windows with sanding
vlies
- smoothing wood surfaces with sanding felt prior
to staining
- rubbing down stained surfaces with sanding
vlies
- rubbing down or removing excess lime paste
with sanding vlies
2 - 3
- interim paint sanding on stained surfaces
- cleaning natural wood window grooves with
sanding felt
1 - 2
- sanding stained edges
- sanding thermoplastic synthetics
Maintenance and care
Any maintenance or repair work re-
quiring the motor housing to be opened may only
be carried out by an authorised service workshop.
Maintenance or repair work carried out by an
unauthorised person can lead to the wrong con-
nection of the power leads or other components,
which in turn can lead to accidents with serious
consequences.
Always remove the plug from the
mains supply socket before carrying out any work
on the machine!
Always keep the machine and the ventilation slots
clean.
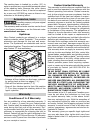
Sanding base brakes
6.1
6.2