


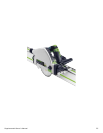


Supplemental Owner’s Manual 21
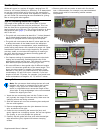
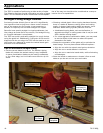
Replacing the Guide Rail Splinter Guard
The splinter guard prevents splintering and chipping of the
workpiece by holding the top edge of the workpiece down
as the teeth of the sawblade move upward against it. The
splinter guard needs to be replaced if it becomes damaged
or worn.
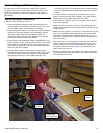
1. Peel the original splinter guard away from the guide rail.
2. As needed, clean residual adhesive and debris from the
guide rail.
3. Peel off the plastic backing from the new splinter guard
to expose the adhesive.
4. Without stretching the rubber, carefully place the new
splinter guard on the underside of the guide rail tight to
the alignment rib.
5. Make sure the splinter guard is rmly pressed down to
the guide rail.
6. Trim the splinter guard as described on page 8.
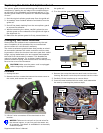
Alignment Rib
Splinter
Guard
Friction
Strips
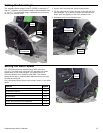
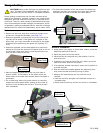
Changing the Motor Brushes
Festool does not condone brush replacement by the end
user. Completion of this procedure by an unauthorized
service center will void the tool’s warranty.
The motor brushes are graphite bars that provide an electri-
cal connection between the motor controller and the rotat-
ing armature. When the brushes have worn past their useful
length, spring loaded wear pins are exposed that separate
the brush from the armature contacts. This disables the
motor to prevent damage. For a shorter break-in period
without excessive arcing, new brushes have ribs that quickly
form to the curve of the armature.
CAUTION! Make sure the power cord is unplugged
before beginning this procedure.
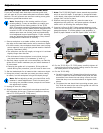
New Brush
Terminal
Spade
Wear Pin
Used Brush
Mounting
Tab
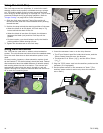
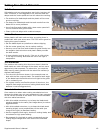
Procedure
1. Unplug the saw.
2. Remove the four screws that secure the access cover to
the motor, and remove the cover.
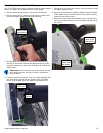
Mounting
Screws
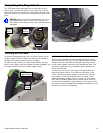
3. Lift the 2 wire connectors off the terminals on the
brushes.
NOTICE: Take care to not pull on the red wires for
the thermal sensor, or you may pull the sensor out
of its pocket. The sensor is embedded in a thermally
conductive paste.
4. Remove the screw that secures each brush to the motor
housing. Be careful not to drop the screws into the motor.
5. Carefully lift the brushes up to remove them.
6. Insert the new brushes into the motor, and reassemble
the saw by reversing the previous steps.
Wire
Terminal
Wire
Terminal
Mounting
Screw
Mounting
Screw
Thermal
Sensor