


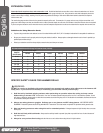


English
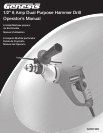
1⁄2” 6 Amp Dual Purpose Hammer Drill
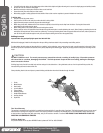
Operator’s Manual GHD1260
6. Wear cushioned gloves and take frequent rest breaks.
7. Always check that the trigger lock is “OFF” before plugging the tool into the power source. Never leave the trigger
locked in the “ON” position when not using the tool.
8. Do not hold the tool or place your hands near the rotating chuck or drill bit.
9. Always check that the material being drilled is secure and clamped in place if necessary to prevent any movement.
10. Never hold the workpiece in your hand, lap or against other parts of the body when drilling or hammer drilling.
11. Always position the cord away from the rotating bit and DO NOT wrap the cord around your arm or wrist.
12. Know the location and setting of the switch “Lock-On” button.
13. Do not use the switch trigger “Lock-On” in situations where drill bit binding or jamming is likely to occur. (Such
as: striking hidden rebar in concrete, just before the bit breaks through the opposite side of the workpiece, when
using large diameter bits, etc.)
14. When using the hammer drill DO NOT position yourself between the tool or auxiliary handle and a wall or post.
15. If the bit jams or binds in the work, immediately release the switch trigger to prevent personal injury.
16. Do not use dull or damaged bits and accessories.
17. Do not use bits larger then those recommended.
18. When removing the drill bit from the tool avoid contact with skin. Allow sufficient time for the bit to cool down or
use proper protective gloves to handle the bit or accessory.
19. Use only percussion-type carbide tipped bits for hammer drilling and do not attempt cutting reinforcing rod with
percussion-type bits.
20. Check the tool and remove any chuck keys or adjusting wrenches before switching the tool “ON”.
OPERATION
Switch Functions
CAUTION:
Always be sure that the tool is switched off and unplugged before adjusting or checking function on the tool.
CAUTION:
Before plugging in the tool, always check to see that the switch trigger actuates properly and returns to the “OFF”
position when released.
TRIGGER CONTROLLED DIALABLE VARIABLE SPEED