


13
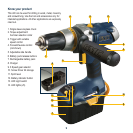
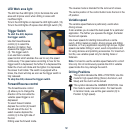
Torque adjustment/hammer selection collar
By rotating the torque adjustment/hammer selection collar
(2) behind the chuck, it is possible to adjust the torque to
each of twenty settings, or select hammer action or the
drill setting.
The range of twenty torque settings allows better control
when using the drill as a screwdriver as it prevents over-
tightening of the screws.
The numbers circling the collar are used to indicate the
level of torque. The higher number on the collar, the
higher torque and the larger the fastener which can be
driven. To select any of the numbers, rotate the collar
(2) until the desired number aligns with the arrow head
indicator on the housing.
3 Speed gearbox
The 3 Speed Gearbox allows
you to select a gear with the
optimum speed and torque to
suit the application.
To select the first gear (low
speed, high torque setting), turn
the tool off and wait until it stops.
Push the gear selector (9) back,
away from the chuck, so the number 1 is displayed.
To select the second gear (medium speed, medium torque
setting), turn the tool off and wait till it stops. Slide the
gear selector forward towards the chuck, so the number 2
is displayed.
To select the third gear (high speed, low torque setting),
turn the tool off and wait until it stops. Slide the gear
selector (9) to the middle position, so the number 3
is displayed.
Note. Do not change gears when the tool is running.
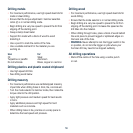
Screw driver bit storage
A convenient storage area (10) with retaining clip, for
screwdriver bits is provided on the left side of the tool.
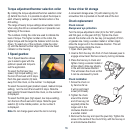
Chuck replacement
Chuck removal
Always wear eye protection.
Turn the torque adjustment collar (2) to the “drill” position
and first gear, on the gear shift (9). Tighten the chuck
around the shorter end of a hex key (not supplied) of 5mm
or greater size. Using a wooden mallet or similar object,
strike the longer end in the clockwise direction. This will
loosen the screw inside the chuck.
1. Open chuck jaws fully.
2. Insert a 5mm hex key into front of chuck between jaws to
engage screw head. Remove screw by turning clockwise.
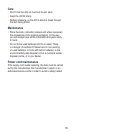
3. Place the hex key in chuck and
tighten. Using a wooden mallet or
similar object, strike key sharply
in the anti-clockwise direction.
This will loosen the chuck so that
it can be unscrewed by hand.
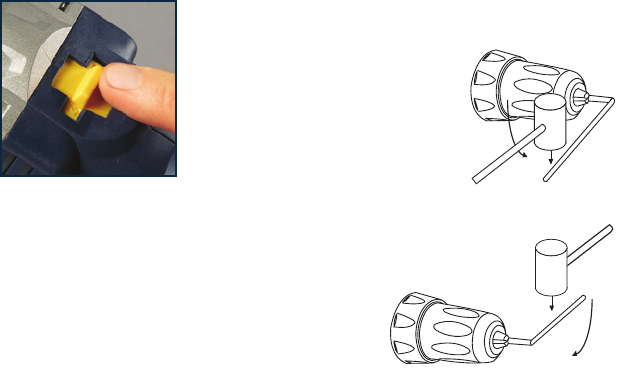
Chuck installation
1. Screw the chuck on
by hand as far as
it will go and insert
screw (LH thread).
2. Tighten the chuck
around the shorter
end of hex key (not
supplied) strike the
longer end in the
clockwise direction with
a wooden mallet.
3. Remove the hex key and open the jaws fully. Tighten the
screw in the centre of the chuck firmly, with the hex key in
an anti-clockwise direction.