


Service
• Have your power tool serviced by a qualified repair
personnel using only identical replacement parts. This
will ensure that the safety of the power tool is maintained.
• When operating a power tool outdoors, use an outdoor
extension cord suitable for outdoor use. Use of a cord
suitable for outdoor use reduces the risk of electric shock.
Additional safety instructions
for glue guns
WARNING. This tool must be placed on its work stand (3)
when not in use.
WARNING. Do not use gloves made of rubber, plastic or
synthetic-type material, as they can melt and burn your skin.
• Ensure this product is always used on a mains circuit
protected by an earth.
• While using the glue gun, be sure to have an ice cold
bowl of water close by. If hot glue is dropped on your skin,
immediately submerge it to prevent a bad burn.
• If accidental contact should occur, do not try to remove the
glue from the skin. Immerse in cold water immediately.
• Always wear cotton safety gloves when applying hot glue to
help prevent burning your hands.
• When the glue gun is not in use, always return it to its
work stand.
• Always ensure the work area is both well lit and
well-ventilated.
• Never leave the glue gun plugged in and unattended or
unattended directly after use.
• Never touch the glue gun nozzle tip while the glue gun is
plugged in or directly after use.
• Avoid inhaling glue vapours generated while in use.
• Keep out of reach of children at all times.
• It is unnecessary to clean the glue gun. Keep glue gun away
from moisture and liquids to avoid electric shock.
• The glue gun should always be operated under the attention
of the user.
• When leaving the glue gun, the user should always ensure
the tool is unplugged and well minded until it has totally
cooled down.
To use this tool properly, you must observe the safety
regulations, the assembly instructions and the operating
instructions to be found in this Manual. All persons who use and
service the machine have to be acquainted with this Manual and
must be informed about its potential hazards. Children and infirm
people must not use this tool. Children should be supervised at
all times if they are in the area in which the tool is being used.
It is also imperative that you observe the accident prevention
regulations in force in your area. The same applies for general
rules of occupational health and safety.
The manufacturer shall not be liable for any changes made to
the tool nor for any damage resulting from such changes.
Even when the tool is used as prescribed it is not possible to
eliminate all residual risk factors. The following hazards may
arise in connection with the tool’s construction and design:
• Damage to the lungs if an effective dust mask is not worn.
• Damage to hearing if effective earmuffs are not worn.
• Damage to eyes if effective goggles are not worn.
• Risk of injury unless hands are kept well clear of hot
components (glue gun nozzle and the top end of the glue
gun housing).
Unpacking
Due to modern mass production techniques, it is unlikely that
your GMC Power Tool is faulty or that a part is missing. If you
find anything wrong, do not operate the tool until the parts have
been replaced or the fault has been rectified. Failure to do so
could result in serious personal injury.
Accessories
The GMC DEC005GG comprises the following components:
1 x Instruction manual
10 x Glue sticks (150mm x Ø11mm)
Operation
WARNING. Before connecting a tool to a power source, be
sure that the voltage supply is the same as that specified on the
nameplate of the tool. A power source with a voltage greater
than that specified for the tool can result in serious injury to
the user, as well as damage to the tool. If in doubt, do not plug
in the tool. Using a power source with a voltage less than the
nameplate rating is harmful to the tool.
Preparing to glue
The GMC Glue Gun is typically used for minor repairs around
the home and for a range of craft and other hobby work.
1. Before beginning to glue, secure the work piece so that it
does not move and affect your accuracy.
2. Prepare a bowl of cold water and place near the work area.
In the event of hot glue touching your skin, submerge the
affected area of skin into the bowl of water immediately.
Setting up the glue gun work stand
NOTE. Ensure the glue gun is resting properly on the work stand
(3) before switching on.
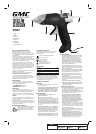
1. By firmly holding the rubber grip (6) with one hand, take
hold of the stand (3) with the other hand and pull it down,
and forward until it locks into the position closest to the glue
distribution nozzle (2). When resting properly, the glue gun
should face downwards at approximately a 45° angle.
Switch on
WARNING. Do not leave the tool turned on for prolonged
periods without use as it will cause the glue stick to partially
melt inside and necessitate a repair.
1. Load the glue stick (5) into the glue stick feeder (4) at the
rear of the glue gun. As the trigger is squeezed, a tab feeds
the glue stick (5) into the heated element where it melts into
an adhesive.
2. Ensure the glue gun is resting securely on its work stand (3)
before plugging it into a power outlet.
3. After switching on the power, allow the tool approximately
5 minutes to heat up to its operating temperature.
Switch off
1. Place the glue gun securely on its stand (3) so the nozzle
does not burn your table top.
2. Switch off the tool at the power supply and unplug the unit.
3. Ensuring the glue gun is placed on it’s stand after use, place
paper or a rag underneath the nozzle (2) as a small amount
of glue may drip during cool down.
4. Unplug the glue gun when finished. Permanently having the
unit plugged in at the mains may cause the unit to overheat.
NOTE. For safety, please ensure the unit is supervised until it
has entirely cooled down.
Gluing
WARNING. Never touch the nozzle (2) or the top end of the glue
gun housing as it gets extremely hot.
NOTE. If the glue gun has been in stand-by with the power on,
press the trigger gently and hot glue will flow from nozzle. Never
squeeze the trigger (1) hard as the glue may overflow from the
inlet tube.
1. Feed a glue stick (5) into the glue stick feeder (4).
2. Press trigger (1) several times until the glue stick is firmly set
into the glue stick feeder (4).
3. After a 5 minute heat up period (approximately), hold the
glue gun firmly on the rubber grip (6) and place your finger
on the trigger (1).
4. Hold the glue gun firmly by the rubber handle (6) with the
nozzle (2) pressed onto one part of the workpiece.
5. When the nozzle is in place, slowly and gently squeeze the
trigger (1) so that glue is dispensed from the nozzle (2). If
the trigger is squeezed too hard, it will become damaged.
NOTE. Glue will dispense in fat blobs if the trigger is pressed
hard and quick, and will flow in a thin and even stream if gentle
pressure is applied to the trigger.
6. When the glue stick has almost finished inside the
glue gun, insert another glue stick in the same way as
previously described.
7. Once the glue has been applied, the two pieces of material
should be pressed together (within 15 seconds) for a short
time to wait for it to dry. A vice of g-clamps can be used for
this purpose.
8. Unplug the glue gun when finished. Never pull the glue stick
out of the back of the glue gun. For the next operation, just
connect the tool to the mains and allow to warm up.
45–55 South Centre Road Melbourne Airport
Victoria, Australia 3045
Tel: (03) 8346 1100 Fax: (03) 8346 1200
Full 2-Year Warranty
This product is warranted for a 2-year period for
home domestic use from the date of the original
purchase. If found to be defective in materials
or workmanship, the tool or the offending faulty
component will be replaced free of charge with
another of the same item. A small freight charge
may apply.
The warranty replacement unit is only made
available by returning the tool to the place of
purchase with a confirmed register receipt.
Proof of purchase is essential. We reserve the
right to reject any claim where the purchase
cannot be verified. This warranty does not
include damage or defects to the tool caused by
or resulting from abuse, accidents, alterations or
commercial or business use.
Consistent with our product development
programme, improvements may have been made
which render the contents of the tool’s packaging
or user instructions slightly different to the
product received.
Phone (03) 8346 1100 Facsimile (03) 8346 1200
Email info@gmca.com.au
Website www.gmcompany.com
Copyright Global Machinery Company Australia
Proprietary Limited, 2001
Dear customer, if you require any help with
your product, whether it is a Warranty Claim,
spare part or user information, please phone our
Help Line 1300 880 001 (Australia) or
0800 445 721 (New Zealand),
for an immediate response.
Product of China manufactured to exacting
GMC quality standards.
ABN: 68 093 174 808
The GMC 777 Helpline
operates from 7am to
7pm, 7 days a week (EST).
This allows you to contact GMC directly with
any queries and technical questions you have
regarding our products.
Save this Manual for future reference.