


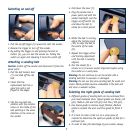


Switching on and off
1. Pull the on/off trigger (5) upward to start the sander.
2. Release the trigger to turn off the sander.
3. By pulling the trigger on and pressing the lock on
button (4), you can lock the sander on. Pulling the
switch on again and releasing it turns the switch off.
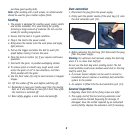
Attaching a sanding belt
Caution. Switch off the sander and disconnect it from the
power point.
1. Pull the belt tension lever
(7) and slide off the old
belt.
2. Check that the
replacement belt has a
good join and is not
frayed at the edges.
3. Slip the new belt into
position with the rotation
arrow on the inside of the
belt pointing in the same
direction as the arrow on
the sander.
4. Fold down the lever (7).
5. Plug the sander into a
power point and with the
sander held tight, pull the
trigger on/off switch (5)
and allow the belt to
rotate for a short period.
6. Whilst the belt is running,
adjust the tracking knob
(10) to align the belt to
the centre of the roller
(6).
7. Repeat the trigger action
and tracking adjustment
until the belt is correctly
aligned.
8. Run the sander for a
minute or so to ensure correct alignment before using
the sander on a work piece.
Warning. Do not continue to use the sander with a
sanding belt that is overworn or damaged.
Warning. Do not use the same sanding belt for wood and
metal. Metal particles become embedded in the belt and
will scour a wooden surface.
Selecting the right grade of sanding belt
1. Different grades of sanding belt can be purchased from
your local hardware store. Typical grades are Coarse (40
grit), Medium (80 and 100 grit) and Fine (120 grit).
2. Use Coarse grade to remove rough finishes, Medium
grade to smooth the work and Fine grade to finish it
off.
3. It is best to make a trial run on a scrap piece of
material to determine the optimum grades of belt for a
particular job.
4. In order to take full advantage of your sander, always
7