


9
Unpacking
Due to modern mass production techniques, it is unlikely
that your GMC Power Tool is faulty or that a part is
missing. If you find anything wrong, do not operate the
tool until the parts have been replaced or the fault has
been rectified. Failure to do so could result in serious
personal injury.
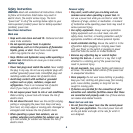
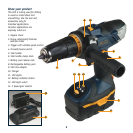
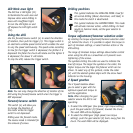
Fitting and removing the battery pack
To remove the battery pack from the drill firmly press the
battery release tabs (7) at either side of the battery pack,
and slide the battery backward out of the tool.
To install the battery pack, align rails, on the tool with
the tabs on the battery pack and slide the battery pack on
to the drill. Ensure the battery
pack is sitting straight on the
foot and correctly entering the
runners. The battery should
slide fully on to the drill foot
until the battery pack “clicks”
into position.
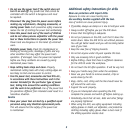
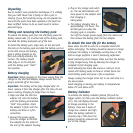
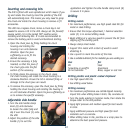
Battery charging
Important. Before plugging in the power supply from the
charger to the slim line adaptor always ensure that the
plug is switched off at the mains.
Important. The battery will be fully charged after 3-5
hours, remove it from the charger after this time. Do not
leave a battery charging for longer than 24 hours.
1. Align and slide the slim line
adaptor (9) onto the battery
until the battery pack latches
“click” into position. Check
the adaptor is flush with the
battery and there is a firm
connection.
2. Connect the power supply
from the charger to the slim
line adaptor via the socket in
the rear of the adaptor housing.
3. Plug in the charger and switch
on. The red LED indicator will
show power to the adaptor and
that charging is
taking place.
4. The battery charging time is
approximately 3–5 hours. The
red LED goes out when the
charging cycle is complete.
Turn off the charger power supply from the mains and
then remove the battery from the line adaptor.
To obtain the best life for the battery
Never allow the drill to come to a complete stand still
before recharging. The battery should be placed on charge
whenever the battery is noticeably running down or the
drill no longer performs a task it previously performed.
Avoid conducting short charges. Make sure that the battery
is fully charged every time by allowing the charger to
complete its full charging cycle.
Avoid allowing lose items like screws or nails etc to be
stored with battery packs as these or similar items can
short battery packs and cause a fire or explosion.
Always unplug the charger when not in use and store in a
dry secure place.
Avoid charging or storing your battery in temperatures
below 0ºC and above 40ºC.
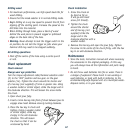
Battery indicator
To activate the battery indicator feature first pull the
trigger switch (3) then press the battery indicator button
(12), this will display the level
of charge remaining in the
battery. There are 3 levels of
charge low, medium and high.
When the battery indicator is
showing only 1 LED (low) the
battery should be removed and
put on the charger.