12
5. The saw will not cut wood by itself, you allow the
saw to cut wood by guiding the wood into the blade
as it moves.
6. The drop foot (8) should always be lowered until it
just rests on top of the work piece to prevent your
work piece from lifting during operation but not so
much that the workpiece drags. To lower or raise the
drop foot loosen the drop foot locking knob (9) and
position the drop foot so it rests on top of the work
piece. Retighten the drop foot locking knob.
6. Ensure that you feed the wood into the blade slowly
because the teeth of the blade are very small and
they can only remove wood when they are on the
down stroke.
7. The blade will flex backwards when applying feed
pressure. Too much feed pressure will cause blade
breakage.
8. Best results are achieved when cutting wood less
than 25mm thick.
9. When cutting wood thicker than 25mm, the user
must feed the wood into the blade very slowly,
increase blade tension and take extra care not to
bend or twist the blade while cutting in order to
maximise blade life.
10. Teeth on scroll saw blades wear quickly and as a
result must be replaced frequently for best cutting
results. Scroll saw blades generally stay sharp for 30
minutes to 2 hours of cutting.
11. Once finished push the on/off switch down to turn
off the saw and unplug the tool from the power
point to prevent unauthorised use.
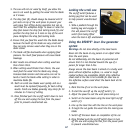
Locking the scroll saw
The on/off switch features a
locking peg that can be used
to help prevent unauthorised
use.
1. Slide a padlock through the
locking peg and engage it,
this will prevent the on/off
switch from being lifted
when the tool is left unattended.
Using the REDEYE® laser line generator
system
Warnings. Do not stare directly at the laser beam.
Never aim the beam at any person or an object other
than the work piece.
Do not deliberately aim the beam at personnel and
ensure that it is not directed towards the eye of a
person for longer than 0.25s.
Always ensure the laser beam is aimed at a sturdy work
piece without reflective surfaces, i.e. wood or rough
coated surfaces are acceptable. Bright shiny reflective
sheet steel or the like is not suitable for laser use as
the reflective surface could direct the beam back at the
operator.
1. Mark the line of cut on the work piece.
2. To start the saw lift up the on/off switch (1).
3. Adjust the speed to suit the work piece being cut.
4. Switch on the laser beam using the laser light on/off
switch (2).
5. Line up the laser line with the line on the work piece
6. To begin the cut guide the wood into the moving saw
blade.
7. Switch off the laser beam on completion of the cut.
8. Once finished push the on/off switch down to turn
off the saw and unplug the tool from the power point
to prevent unauthorised use.


