


Installing and removing collets
CAUTION. Always ensure that the router is switched off
and unplugged from the mains supply before installing or
removing a collet.
1. The router is supplied with 2 collets, 1/2” (12.7mm)
and 1/4” (6.35mm). The 1/2” (12.7mm) collet comes
fitted to the router.
2. Depending on the size of the router bit the collet may
need to be changed to allow use of larger or smaller
diameter router bits.
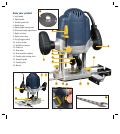
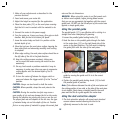
3. Depress and hold the
spindle lock button (11)
to stop the spindle from
turning.
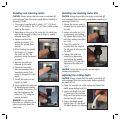
4. Whilst holding the spindle
lock button (11) loosen
the collet nut (12) by
rotating it using the wrench
provided.
5. Remove the collet nut
followed by the collet
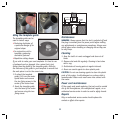
6. Install the new collet
into the assembly; this is
sometimes easier if the
router is plunged to its full
depth.
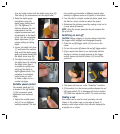
7. Install the collet nut and
tighten by hand.
8. Firmly tighten the collet nut
by depressing and holding
the spindle lock button (11)
and then tightening the
collet nut (12) using the
wrench provided.
WARNING. Do not tighten
the collet nut without a bit in
place or you may break the
collet cone.
Installing and removing router bits
CAUTION. Always ensure that the router is switched off
and unplugged from the mains supply before installing or
removing a router bit.
1. Ensure the correct collet is
installed for the router bit to
be used.
2. Loosen the collet nut (12)
by depressing and holding
the spindle lock button (11)
and then rotating the collet
nut (12).
3. Insert the router bit
ensuring that the shaft of
the bit goes all the way into
the collet.
4. Tighten the collet nut
assembly by depressing
and holding the spindle
lock button (11) and then
tightening the collet nut
(12).
CAUTION. Ensure the bit is firmly secured before
commencing operation.
Adjusting the cutting depth
CAUTION. Always ensure that the router is switched off
and unplugged from the mains supply before adjusting
the depth of cut.
1. Place the machine on a flat surface and loosen the
depth gauge locking knob (5).
2. Loosen the depth lock lever
(7) and lower the machine
body until the router bit just
touches the flat surface.
3. Loosen the depth gauge
locking knob (5) and lower
the depth gauge (4) allowing
8