


8
Switching on and off
1. Connect the plug to the power supply.
2. Squeeze the on/off trigger switch (4) to start the sander.
3. To lock the switch “on” for continuous operation, press the
lock-on button (5) while the trigger is engaged.
4. To release the lock-on button, squeeze and release the
trigger switch.
5. Hold the tool securely and make sure that you have full
control at all times.
Using the sander
The sander can be used for most sanding and polishing
operations on materials such as wood, plastic, steel and
painted surfaces.
CAUTION. Always wear safety goggles and a mask.
1. Grip the rear handle (9) in one hand and push down on
the adjustable front handle (1) with the other hand. Hold
the sander flat against the workpiece before switching on.
2. Switch the sander on and move it evenly over the
work surface in a circular motion using only moderate
pressure.
3. If marks remain in the work surface, try using a coarser
grit before recommencing with the original grit choice.
Alternatively try using a new disc of the same grit before
going on to a finer grit and finishing the job.
4. For polishing, a lambs wool polishing bonnet (not
supplied) can be purchased to fit the platen. When fitted
and used with a good quality polish it can be used to
polish paintwork to a high sheen. Use a low speed to
prevent burning the paintwork.
WARNING. Use great care when polishing and follow all
polish manufacturers recommendations. Always test first
on a small area which will not be seen.
Ensure any sanding grit residue is completely cleaned from
the sander and platen before using as a polisher. If grit is
present when polishing it can scratch the work surface. The
manufacturer takes no responsibility for scratches resulting
from sanding grit residue.
Adjusting the speed
The speed can be adjusted to
suit the material being sanded.
To adjust the speed, move the
variable speed control (6) until
you are satisfied that the speed is
what you need for the job in hand.
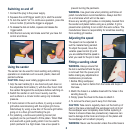
Fitting a sanding sheet
WARNING. Always ensure that
the tool is switched off and the plug
is removed from the power point
before making any adjustments or
maintenance procedures.
1. Before fitting sandpaper,
remove any dust or debris from the hooks and loops of
the base.
2. Match the holes in a suitable sheet with the holes in the
sanding base (3).
3. Simply press the sheet to the base to attach it.
4. To remove the sheet, peel it away from the base.
CAUTION. Take care to regularly clean out the build up of
dust on the base underneath the sandpaper and not to let
the sandpaper wear completely down before replacing it.
Failure to observe these two precautionary measures can
lead to damage to the hooks and loops on the platen and
the sandpaper will not attach properly.
WARNING: Never use the sander unless the entire base is