7309411
Troubleshooting
Relieve pressure; page 6.
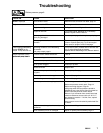
PROBLEM CAUSE SOLUTION
E=XX is displayed Fault condition exists Determine fault correction from table, page 14.
Engine won’t start Engine switch is OFF Turn engine switch on.
Engine is out of gas Refill gas tank. Honda Engines Owner’s Manual.
Engine oil level low Try to start engine. Replenish oil, if necessary.
Honda Engines Owner’s Manual.
Spark plug cable disconnected or
spark plug damaged
Connect spark plug cable or replace spark plug.
Oil seepage into combustion
chamber
Remove spark plug. Pull starter rope 3 or 4 times.
Clean or replace spark plug. Try to start engine.
Keep sprayer upright to avoid oil seepage.
False tripping of WatchDog
system. EMPTY is dis-
played. Pump does not run.
Operating conditions out of WatchDog
parameters
Low pump output; page 8.
Turn pressure down. Contact Graco Technical Ser-
vice to adjust WatchDog parameters.
Operate without WatchDog active; Manual 309410.
Engine operates, but dis-
placement pump doesn
’
t
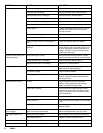
Pressure control switch turned OFF Turn on.
placement pump doesn’t
Pressure setting too low Increase pressure.
Displacement pump outlet filter dirty Clean filter.
Tip or tip filter clogged Clean tip or tip filter.
Broken drive belt Replace belt.
Displacement pump rod seized by
dry paint
Service pump. See page 16.
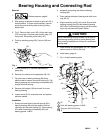
Connecting rod worn or damaged Replace. See page 9.
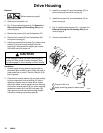
Drive housing worn or damaged Replace. See page 10.
Electrical power is not energizing clutch field Check wiring connections. Page 23.
Reference pressure control repair. Page 14.
Reference wiring diagram. Page 23.
With pump switch ON and pressure turned to
MAXIMUM, use a test light to check for power be-
tween clutch test points on control board.
Remove 7–pin connector from control board and
measure resistance across clutch coil. At 70_ F,
the resistance must be 1.7
±0.2Ω; if not, replace
pinion housing.
Have pressure control checked by authorized Gra-
co dealer.
Clutch is worn, damaged, or incorrectly
positioned
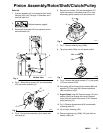
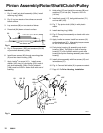
Replace clutch. Page 11.
Pinion assembly is worn or damaged Repair or replace pinion assembly. Page 11.


