


308253 11
Service
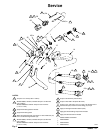
NOTES:
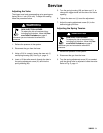
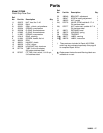
Torque to 6–10 in-lbs (0.68–1.13 NSm)
Models 235627, 237607, & 237649: Torque to 70–80 in-lbs
(7.9–9.0 NSm)
Models 235628 and 243775: Torque to 100–125 in-lbs
(11.3–14.1 NSm)
Apply lithium base grease to threads
Apply lithium base grease
Models 235627, 237607, & 237649: Torque to 50–60 in-lbs
(5.6–6.8 NSm)
Models 235628 and 243775: Torque to 100–125 in-lbs
(11.3–14.1 NSm)
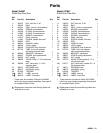
Models 235627, 237607, and 237649
Models 235628 and 243775
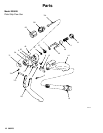
A
C
E
F
H
{
*
04809A
26
24{
21
4
28
27
3
1
20
E
E
C
E
E
H
F
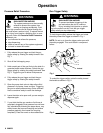
Fig. 4
F
A
24*
E
17
{42
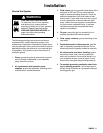
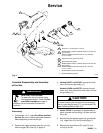
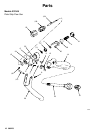
Complete Disassembly and Assembly
of the Gun
WARNING
SKIN INJECTION HAZARD
To reduce the risk of a serious injury,
including fluid injection, follow the Pres-
sure Relief Procedure on page 6
whenever you are instructed to relieve the
pressure.
Disassembly
1. Follow steps 1 to 7 under Valve Stem and Seal
Service. Be sure to relieve the system pressure
before beginning to service the gun.
2. Remove the trigger retaining rings (8), rod (13),
and the trigger (29). See Fig. 6, page 13.
3. Models 235627 and 237607: unscrew the fluid
tube (19) from the gun body (17).
Models 235628 and 243775: unscrew the set-
screw (42), then unscrew the fluid tube (19) from
the gun body (17).
CAUTION
To avoid loosening the connections and damaging
the gun, grip the gun body (17), not the handle (14),
when removing the fluid tube (19).
4. Model 237649: if necessary for replacement of
parts, unscrew the inlet fitting (19) from the fluid
tube (18).
5. Remove the gun handle screws (9), gun handle
(14), trigger lock (15), ball (2) and spring (7).
6. Remove the seal retainer (27), seal (3), and
o-rings (5 and 6).