


Return Tube Kit
2 309852E
Return Tube Kit
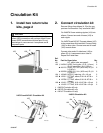
Remove dryer carriage (C). Using awl or similar
tool, punch a few small holes in each end of car-
riage. Reinstall carriage.
Remove large fitting included with dryer (10). It
is not needed for this application.
Apply thread sealant (8) to threads. Assemble
return tube kit as shown at right.
Open drum port. Lower kit into drum. Screw tee
(6) into drum port to secure. Use bushing (5) to
adjust position of tube (4) in tank.
The Return Tube Kit can be installed singly or as
a pair. Two are included in the Circulation Kit,
page 3.
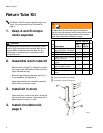
1. Keep A and B compo-
nents separate
CAUTION
To prevent cross-contamination of fluid, mark A com-
ponent (ISO) connections with red tape. Mark B com-
ponent (RES) connections with blue tape. Do not
interchange or cross-connect A component and B
component parts.
2. Assemble return tube kit
3. Install kit in drum
4. Install circulation kit,
page 3
WARNING
To reduce the risk of serious injury including fluid
injection, use high pressure return hoses rated to with-
stand the maximum working pressure of the propor-
tioner. See proportioner operation manual.
Ref.
No. Description
Return Tube Kit
Qty
(CS)
246477
(SST)
24D106
1 ELBOW, 90°; 1/2 in. (13
mm) OD tube x 1/2 npt(m)
117532 16C635 1
2 FERRULE, tube; sst 117453 117453 1
3 NUT, tube, flareless 117454 16C636 1
4 TUBE; sst; 1/2 in. (13 mm)
OD; 4 ft (1.2 m)
15C514 15C514 1
5 BUSHING, strain relief; 3/4
npt(m)
117811 117811 1
6 TEE, street; 3/4 npt (mxf)
run; 3/4 npt(f) branch
111337 16C637 1
8 SEALANT, pipe; 6 ml 110110 110110 1
10 KIT, accessory, desiccant
dryer
247616 247616 1
TI3446a
10
6
5
4
3
2
1
1
Apply thread sealant (8) to threads.
Punch holes in ends of carriage (C).
1
2
1
2
C