


Service
Topics Covered in this Chapter
♦ Sealant Gun Body Disassembly (C04093)
♦ Gun Handle Disassembly (C04079)
♦ Sealant Gun Reassembly (C04093)
♦ Gun Handle Assembly (C04079)
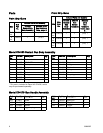
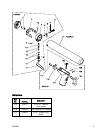
Sealant Gun Body Disassembly
(C04093)
This procedure describes how to disassemble the
sealant gun. Refer to Parts, page 8.
1. Shut off material and air supply lines to gun.
2. Actuate gun to purge material.
Pressure Relief Procedure, page 5 , from
gun.
3. Disconnect air hose from sealant gun.
4. Unhook bracket (2) from retainer (21) and
remove from sealant gun.
5. Disassemble parts attached to gun body as
follows:
a. Cotter pin (3)
b. Knob and stud assembly (1)
c. Roll pin (10) and lever (17)
d. Snap ring (16) that holds the sleeve (15),
two o-rings (14), push rod (13), o-ring (12),
poppet (11) and spring (9) inside the body
(4).
e. Unscrew the swivel screw (8) and remove
the o-rings (14), swivel (6) and washer (5).
Note
The gun handle assembly should not be
disassembled unless the original parts are
worn or damaged.
Gun Handle Disassembly (C04079)
1. Remove the screw (101) and clamp (102) from
the handle (103).
2. Carefully tap the spring pin (105) and trigger pin
(106) out of the handle assembly.
3. Remove the trigger (107) and trigger spring (104)
from the handle (103).
Sealant Gun Reassembly (C04093)
Note
• Clean all parts thoroughly before
reassembling. Check them carefully for
damage or wear, replacing parts if needed.
• Repair Kit C04094 is available to service
the Sealant Gun body. For best results,
replace the original parts with new parts
in the repair kit.
• Prior to installation, lubricate all seals and
o-rings with PARKER-O-LUBE™ or an
equivalent lubricant. Check the material
supplier for a compatible lubricant.
1. Clean and free all parts of solid material residue.
2. Reassemble gun body as follows:
a. Install washer (5), swivel (6), two o-rings (14)
and screw (8).
b. Install spring (9), poppet (11), o-ring (12),
push rod (13), two o-rings (14), sleeve (15)
andsnapring(16)insidebody.
c. Install lever (17) and roll pin (10).
d. Install knob assembly (1) and bracket (2).
e. Install cotter pin (3).
3. Hook bracket (2) onto the retainer (21). Install
parts on the gun.
4. Reconnect air hose to sealant gun.
5. Turn on air supply to sealant gun. Check for
leaks.
Gun Handle Assembly (C04079)
1. Place trigger (107) and trigger spring (104) inside
handle (103). Make sure trigger spring is aligned
correctly with trigger.
2. Insert spring pin (105) and trigger pin (106) into
holes in handle (103) assembly.
3. Install clamp (102) and screw (101) in handle
(103) assembly.
309968D
7