


Repair
12 312781E
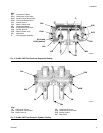
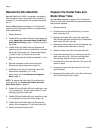
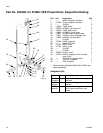
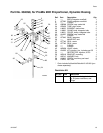
Rebuild the Mix Manifold
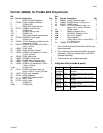
Manifold Rebuild Kit 15U931 is available. See page 15.
Parts included in the kit are marked with a symbol, for
example (3*). For best results, use all parts included in
the kit.
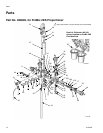
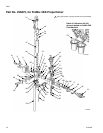
See the Parts drawings on pages 14-19. Clean and
inspect all parts. Apply pipe sealant to all pipe threads
when reassembling.
1. Relieve pressure.
2. ProMix 2KS and ProMix 3KS only: Follow steps 2-6
under Repair the Valves and Seats (ProMix 2KS
and ProMix 3KS only), page 11. Do this for each of
the valves.
3. ProMix 2KS and ProMix 3KS only: Remove the
retaining ring (22) from the manifold block. Unscrew
the shutoff valve handle (12). Remove the backup
(14) and o-ring (13). Repeat for each side.
4. Remove the screws (23) and the manifolds (11, 8, or
36).
5. Note the orientation of the check valves (45).
Remove the check valves and o-rings (5).
6. Install the new o-ring (5*) and check valve (45*).
Reinstall the manifolds (11, 8, or 36).
7. Follow steps 2-5 under Remove the Integrator
Mixer, page 10.
NOTE: To replace the outlet tube (21) and the static
mixer tube (24), see Replace the Outlet Tube and
Static Mixer Tube, on page 12.
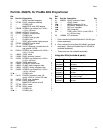
8. ProMix 2KS and ProMix 3KS only: Install the o-ring
(13*), backup (14*), shutoff valve handle (12), and
retaining ring (22) on each side.
9. ProMix 2KS and ProMix 3KS only: Install the o-rings
(15*) and seats (16) for each of the valves (19).
10. ProMix 2KS and ProMix 3KS only: Reinstall the
valves (19) and adapters (17) with the screws (20).
11. Reconnect the fluid and air lines.
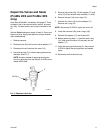
Replace the Outlet Tube and
Static Mixer Tube
See the Parts drawings on pages 14-19. If the outlet
tube (21) or the static mixer tube (24) need replacement,
both must be replaced.
1. Relieve pressure.
2. Unscrew the nut of the outlet tube (21) from the
static mixer tube (24).
3. Remove the screws (30), cover (29), and clamp
(28). Remove the static mixer tube (24). Remove the
static mixer (25) from the tube.
4. Remove the outlet tube (21) from the integrator cap
(49). Install the new outlet tube in the cap.
5. Install the static mixer (25) in the new tube (24).
6. Screw the outlet tube (21) nut and ferrule onto the
static mixer tube (24) 1.25 turns past hand tight.
This securely seats the ferrule on the tube.
7. Unscrew the nut from the tube (24). The ferrule will
remain in place.
8. Screw the nut back onto the tube (24) 1.25 turns
past hand tight.
9. Reassemble the clamp (28), cover (29), and screws
(30) to hold the tube (24) in place.